Georgia Garden Girl

Garden Great in Zone 8!

Hypertufa Workshop This Weekend!

This Saturday, March 29, 2014, the good folks at Columbus Botanical Garden will show us how to make custom hypertufa containers.  For only $35 ($40 for non-members), you will learn how to make your very own piece of outdoor art!  The workshop is 10:00 am to 1:00 pm.  Bring rubber gloves, a large garbage bag, and a form (e.g., a plastic Rubbermaid container—make sure it’s smaller than one cubic foot).  Sign up online: http://columbusbotanicalgarden.com/event/hypertufa-workshop-2/ or call the Columbus Botanical Garden for more information – 706-327-8400.  Hope to see you there!

Image

Photo courtesy of Columbus Botanical Garden.

If you can’t make it to the workshop but are interested in learning more about hypertufa, check out:
http://www.marthastewart.com/268091/pots-with-a-personal-touch-hypertufa:
http://www.lowes.com/creative-ideas/woodworking-and-crafts/make-hypertufa-pots/project

Advertisement
Leave a comment »

Shelter Them

In case you haven’t heard, we are expecting a freeze TONIGHT, March 25, in middle Georgia. So, if you have started hardening off your summer annuals outside, double check your local forecast. If you’re expecting below the low 30s, bring those babies inside! And if you got a little ahead of the weatherman and already planted your tomatoes, be sure that you cover them tomorrow evening.

I went ahead and brought in my plants yesterday evening. They will go back outside later in the week. But for now, they have taken over the dining room.

I hope you and your plants weather the freeze!

20140324-210041.jpg

Leave a comment »

Tough Love

Happy Spring, y’all!

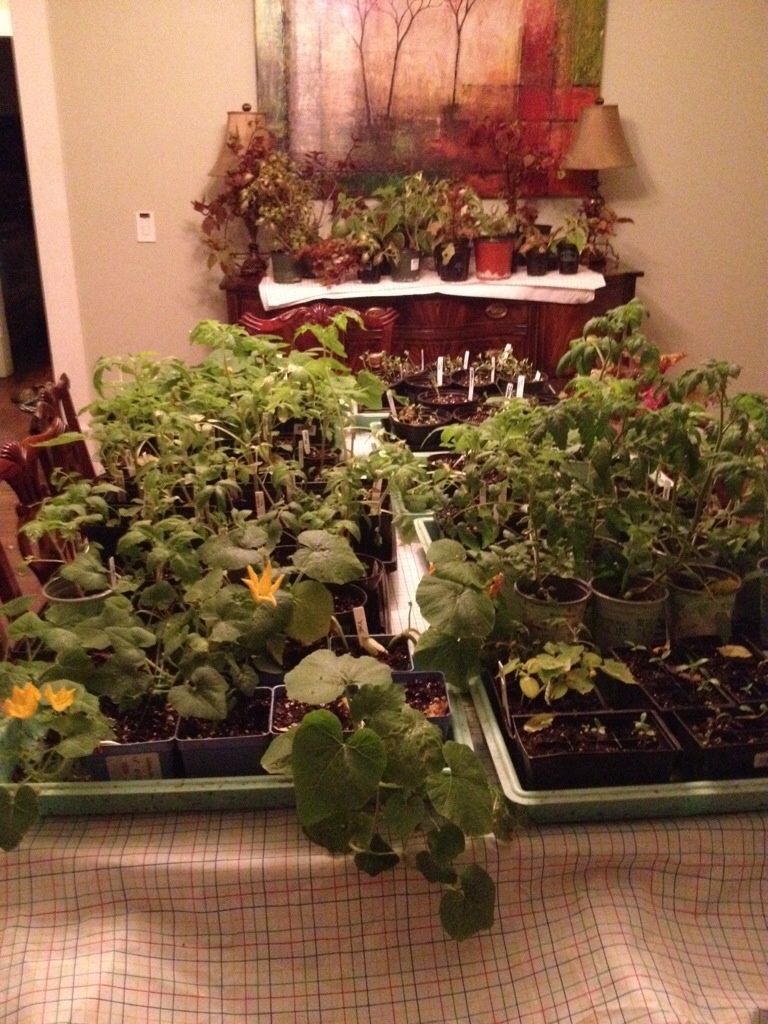
I started my tomato and pepper seeds indoors back in January, and I started some other vegetables in February.  These veggies have been living in the lap of luxury in my laundry room—a constant, warm temperature, regular watering with a light stream of tepid water, and gentle yet effective lights.

Now, it is time to prepare my plants for the harsh realities of the world.  They will have to be tough to make it out there, where the temperature fluctuates, cold rain pours, wind blows, and the sunlight is a lot more intense than a little fluorescent shop light.

Obviously, I should not just go ahead and move the plants into the direct sunlight of the vegetable garden.  They need to be moved gradually so they have a chance to adjust.  This process is called “hardening off.”  And it is very, very important.  I learned this lesson the hard way.  During the first year of my vegetable garden, I grew some beautiful tomato plants from seed, and I was itching to get them into the ground.  So I took them from the laundry room where they had been coddled for two months and planted them directly in my raised beds.  Big mistake.  On their first day outside, the sun badly burned the leaves.  Though the plants eventually recovered, my mistake cost me about a month of tomato production time.  I will never make that mistake again.

Now, I have a five-step process for hardening off my plants.  First, I have to figure out when to start hardening off.  A lot of considerations are factored into the calculus of exactly when to start hardening off.  There’s the date (are we within a week or two of our 50% frost date?).  There’s the weather (is there a threat of a frost? will the temperatures generally be in the mid-40s or above at night? are we expecting a monsoon?).  There’s the soil temperature (is it getting close to 60°F?).  In general, I try to start hardening off the plants a week or two before our 50% frost date, which is March 23 in my part of Middle Georgia.  But if it looks like there will be a frost or a bad storm, I will wait.

After I calculate my hardening off start date, I’m ready to move to steps two through five.  Step Two: I start the hardening off process in the carport.

Carport

Step Three: after a couple days in the carport, I move the plants to a shady part of my deck.  Step Four: after a couple days there, I move the plants to a partly sunny part of the deck.  Step Five: after a few more days, I move the plants to a slightly sunnier part of the vegetable garden.  And then, after a few more days, the plants are sufficiently hardened off and ready to be moved to their beds.  Right now, my plants are somewhere between Step Two and Step Three (sorry – I forgot to take a picture).

While you’re hardening off your plants, be careful to watch the weather reports.  If you know there will be a bad storm, you probably want to bring the plants under cover—or at least out of the path of potential falling branches.  And watch the nighttime temperature.  In the 40s, tomatoes and peppers will probably be okay. But not okra.  Last weekend, the nighttime temperatures dipped into the low 40s, and my smallest okra showed serious signs of distress, so it and its brethren are now back inside for a few more days.

The fine folks at the Weather Channel are predicting overnight lows in the low 30s in Middle Georgia on Tuesday and Wednesday of next week; I will keep an eye on the predictions.  If the temperatures do get that close to freezing, I will need to schlep everything back inside at night.

Good luck with your own tough love!

1 Comment »

Lazy Girl’s Guide to Orchid Maintenance

I get a lot of questions from friends about how to care for plants.  The questions about outdoor plants are all over the map (Q: how long will it take my new blueberry bush to produce? A: about 3 years; Q: why did my basil plant turn black? A: it froze; Q: the best thing for my lawn would be to set it on fire and reseed, right? A: Um, wrong.).  But the vast majority of questions about indoor plants are about one type: the phalaenopsis orchid.  Folks are so worried about what to do with these plants!  So today, I would like to dispel some rumors about orchids.

Phalaenopsis orchids (a/k/a moth orchids) are lovely.  Their blooms last at least a month.  They are widely available at florist shops, grocery stores, and big box stores—especially around Valentine’s Day and Mother’s Day.  Phalaenopsis orchids make a wonderful gift, and that gift could last for years (my oldest phalaenopsis is at least ten years old).

Most folks think that orchids are fussy and hard to grow.  I too had been led to believe that orchids must be coddled with special light, special fertilizer, and constant care.  Hogwash!  I have had excellent results without spritzing “just so” or even remembering to fertilize on a regular basis.  In fact, all of my phalaenopsis orchids are currently blooming.  Do they look exactly like the ones that were carefully raised in a fancy commercial greenhouse?  Mercy, no.  But they do have flowers, and I think they’re glorious.  See?

IMG_2080   Office Orchid

Here are the major steps I followed.  Disclaimer: my “techniques” have not been approved by any extension services or orchid societies.  Obviously.

  1. I put them near a window.  Phalaenopsis orchids are great because they don’t require a whole lot of light, and they are happy with the temperature in my house (between 65º F and 80º F, depending on the season).  Before I had my shop light set-up in the laundry room, I kept my orchids in a bright window, and that worked just fine.  Now, they are under the shop lights until they bloom.  When an orchid is blooming, I usually put it on display somewhere out of direct light so that the blooms will last longer.  If it’s been a while since your orchid bloomed, it might need more light.
  2. I did not repot them in soil.  Your orchid will likely come potted in bark or moss.  That is because orchids grow best in soilless mixtures.  The experts say to repot orchids every one to three years.  Um, okay.  My orchids are not on an official schedule.  When the roots are spilling out of the containers, I think, “Hey, maybe I should repot that.”  If I have the same thought several times and I happen to have some orchid potting mixture handy, then I might repot the orchid.  But I do always use an orchid potting mixture and not regular potting soil.
  3. I did not let them sit in water (most of the time), and I did not forget to water them (most of the time).  The experts will tell you to water in the morning, placing the plant in the sink and using tepid water and an elaborate ritual that involves letting the water run through the plants for a minute/letting the plant drain completely/gently wiping excess water off the leaves.  If you have time to do that, great.  If not, just make sure they do get watered.  Let them dry out a little before you water them again—if the pot feels heavy, skip watering.  My orchids are all potted in a bark medium in plastic pots.  The pots sit in seedling trays.  I spray water into their pots using an indoor hose that is connected to the laundry room sink.  Occasionally, I accidentally overwater, and water remains in the tray/on the leaves.  They lived.  And although I know I’m not supposed to let the orchids dry out completely, it has happened.  They lived.  My orchids are not on a strict watering schedule, but I’d say I typically remember to water them about once a week.
  4. I occasionally remembered to fertilize them.  But really not that often.  The experts advise using an orchid fertilizer.  Some even recommend special fertilizers based on the season—a high nitrogen fertilizer in the spring, and a high phosphorous fertilizer in the fall.  They recommend feeding weakly (about half strength) weekly or feeding monthly.  Yep.  I haven’t quite gotten there yet.  I do know that too much fertilizer is bad, so I don’t feel terrible about forgetting to fertilize the orchids.  I bought some orchid “bloom booster” fertilizer several years ago, and when I happen to see it sitting on the shelf and happen to have a gallon jug free, I might mix up a batch and feed the orchids.  It might happen once a quarter.
  5. I did not expect miracles.  Phalaenopsis orchids bloom once a year.  That’s it.  So I knew that I wasn’t going to get more flowers shortly after the old ones faded.  Okay, if you know how to prune the stem, you might get a second bloom.  I have never had much success with stem pruning, so I just cut the stem off when the flowers have faded and wait until next year’s blooms.  When the orchid does bloom, the flowers last for weeks.

Now, as you can see, orchids need not be daunting.  They can be beautiful even with imperfect care.  But if you are interested in knowing how to grow orchids the “right way,” check out the tips from the American Orchid Society.

3 Comments »

Time to Get Ready

Y’all may as well know.  I love to-do lists.  I love making to-do lists, and I especially love crossing things off my to-do lists.  It’s just about time for the weekend, and that means that my garden to-do list is getting long!

We’ve had some glorious weather in middle Georgia over the past couple of days (though it did get downright cold last night).  I’m sorry to say that our friends at the Weather Channel are not predicting similar gloriousness this weekend.  It is supposed to be cloudy on Saturday and rainy on Sunday.  But that will not stop me from trying to cross a few things off my list:

  • Divide perennials and give leftovers to friends.  I didn’t get around to dividing my spring and summer perennials at the ideal time (October).  It was football season—give me a break.  But now is also a good time to divide.  Mama says, “If you have to buy hostas, you don’t have any friends.”  So get digging and share your wealth of daisies, hostas, black eyed susans, sedums, etc.
  • Weed and mulch perennial beds.  While I’m dividing the perennials, I may as well pull some weeds and then put down some mulch.  If I’m feeling extra industrious, I’ll mulch with old newspapers and then pinestraw—that will save me some weeding time in the summer.
  • Start hardening off vegetable seedlings and coleus plants.  I overwintered my coleus plants inside and rooted some new ones.  Now, I have six flats of coleus plants, and I’m ready to get them out of the kitchen/dining room/living room.  And I started my tomato and pepper seeds back in January, plus some other veggie seeds in February.  They are getting too big to stay under the lights.  Here’s what they looked like last weekend:
    20140309
    (Yes, those are pumpkins in the middle on the bottom—I was doing some germination tests, and I’ve decided to keep on testing.  Don’t judge).
    Anyway, before I plant any of these babies outside (which I will NOT be doing this weekend), I need to get them used to the sun and the temperature.  So, I will put them outside in a shaded, sheltered location for a few days, and I will gradually transition them into the sunny spot where they will spend the summer.  And if I receive a frost warning, I will bring them right back inside!
  • Check outdoor faucets and hoses for leaks.  My plumber friend is coming by next week to give me an estimate on a bathroom remodel.  While he is at my house, I may as well see if he can fix any outdoor faucet leaks, which means that I need to figure out where the leaks are this weekend.
  • Prune the dwarf yaupons.  It’s a good time to prune ornamentals like hollies and boxwoods.  And if your oleander froze, you probably want to cut that back too.  For pruning tips, click here.
  • Trim the liriope.  Okay, I’ve already done this one.  Isn’t it nice to have something already off the list?  But if you haven’t trimmed your liriope, you probably want to go ahead and get that done before the new growth starts.  Just take a string trimmer to it.  Or, if it’s a large area of liriope and there are no nearby barriers (say, metal or concrete edging), just take your mower, set it to its highest setting, and mow the liriope.

One thing I will NOT be doing this weekend is planting my summer vegetables outside.  I know they’ve got them in the stores, but that doesn’t mean you need to plant them.  Our 50% frost date isn’t even until next Sunday, March 23.  Plus, the soil temperature isn’t warm enough yet.  It is getting mighty close, though.  Remember, we need the soil temperature to be at least 60°F for tomatoes, 65°F for okra, and 70°F for peppers.  Down in Quitman County, the 2 inch soil temperature was about 60°F earlier today, and the 4 inch soil temperature was 56.8°F.  Up in Harris County, the 2 inch soil temperature was 58.7°F, and the 4 inch soil temperature was 53.7°F.  You can check your soil temperature using a meat thermometer.  Or you can go to http://georgiaweather.net/.  The upshot: don’t plant your summer vegetables outside now unless you want to (a) stunt their growth and (b) cover them or dig them up in the event of a frost.  All right.  I’ll get off the soapbox now.  If you really want to plant your tomatoes now, that’s your journey.

I hope you have a marvelous weekend.  And I hope you cross many tasks off your to-do list!

Leave a comment »

My Action-Packed Weekend

What a lovely weekend in Zone 8! Sunshine and 70s. Daffodils and hellebores blooming. Bees buzzing around blueberry flowers. New perennial leaves peeking out of the ground. Green grass blades appearing here and there. Viburnums preparing to put on a beautiful display.

It was a great weekend to get some of those late winter/early spring tasks done, so my weekend was action-packed (granted, my definition of “action-packed” may not be the same as yours):

  • Pruned the oleander, which had been hit hard by the recent freezes.
  • Pruned the roses.
  • Cut the suckers off the cherry tree.
  • Checked the hoses and sprayer nozzles for leaks.
  • Dug up some azaleas that I never liked (my predecessor apparently loved red and Pepto-Bismol pink together) and replaced them with baby hellebores from Sunshine Farm & Gardens.
  • Planted the strawberries I had divided several weeks ago.
  • Interplanted roses and strawberries with onions (per the recommendation of the book Carrots Love Tomatoes).
  • Moved some perennials and started making a map of where to plant new ones.
  • Finished building raised beds around my new asparagus crowns, which went in the ground back in February.
  • Planted the fatsia I’ve been meaning to plant for ages.
  • Replaced my sweet, precious winter Daphne (may she rest in peace) with a new one.
  • Repotted some of the coleus I’ve been overwintering inside and started setting it out to harden off.

There were, of course, unpleasant surprises.  I learned the hard way that a colony of fire ants happily spent the winter in my large blue strawberry pot (thank you, Benadryl cream, for fixing my hand).  I noticed that many of my more tender perennials are gone—likely due to a combination of the recent freezes and my former yard man’s eager weed whacker.   And I did make a mistake or two. The most significant one: I followed the package directions on the caladium bulbs and went ahead and planted them BEFORE consulting an expert. Oops. Walter Reeves says that caladiums are tropical and should not go into the ground until the soil temperature is 65°. That’s okra planting weather, y’all. Oh, well. If I had followed my initial inclination to start them in pots, there would be no problem. Or if I had at least marked them, I could dig them up. But I didn’t, so I will just hope they come up anyway.

It is Monday, and I’m a little achy after all that work. But the pile of branches at the street is impressive, and I am glad to see everything start to shape up for spring.

Leave a comment »