Parasitic wasp,
Thank you for laying your eggs
On the bad hornworm.

Parasitic wasp,
Thank you for laying your eggs
On the bad hornworm.
Every year, I have been thwarted by my evil arch nemesis, the squash vine borer. If you’re not familiar with this pest, count your lucky stars. A squash vine borer will turn your beautiful zucchini plant into a wilting heap of tragedy overnight. It’s bad, y’all.
So I moved my squash patch and resolved to be extra vigilant this year. I haven’t been great on the “extra vigilant” part, in part because of my wonderful trip last week to Holland, Michigan to see the tulips (more later). But I did move the zucchini to a spot that is right outside my carport, so I do see them a bit more often than I see some of my other veggies. I decided to check the vines for eggs yesterday, and I found some.

The book Good Bug, Bad Bug by Jessica Walliser suggests picking off the eggs and squashing them, plus spraying with a horticultural oil. And then double check for frass. If you see frass (it looks like sawdust), that means that the borer larvae have already hatched and started treating your plant as an all-you-can-eat buffet. Gently cut the stem with an X-acto knife and extract the borer with some tweezers. Then cover the wound with dirt. Here is a picture of a larva from last year, when I didn’t catch the eggs in time.

So, if you live in Middle Georgia and you’re growing squash or pumpkins, get outside this weekend and look for eggs. You’ll be so glad you did!
I hope you got through last night’s storms all right. All seems to be well in my neck of the woods, but the folks over and Alabama and Mississippi are hurting again. I hope tonight’s storm is not as bad.
As I was looking for downed limbs this afternoon, I noticed them. The snow peas! The first vegetables of my spring season! All fourteen of them! Some of which were a little too small to pick but I picked them anyway! So exciting!

Yes, there will be many more snow peas. And yes, I do long for the days of summer when I have my first Cherokee Purple on white bread with Duke’s mayonnaise. But the first harvest is a big milestone. It means that the vegetable garden is officially awake. It means that the hard work and planning are starting to pay off. And it means that I can’t continue to put off reinstalling my drip irrigation system. But for right now this second, I will savor each one of those fourteen little snow peas. Yum.
We survived last week’s frost warning and rain and made it to Easter! Though the day started out chilly and gray, the afternoon could not have been more beautiful. After I worked the early shift for the mission trip pancake breakfast, attended an excellent Easter service at The Ridge, and took a walk with my trusty Great Dane Clementine, I headed outside to spend a lovely day in the yard.
As I walked around making my mental to-do list, I saw it. My first peony blossom. I planted peonies two years ago, but they never bloomed. I think the cold winter encouraged the blossoms:

My First Peony Blossom
I also had a surprise amaryllis bloom. I usually dig up all the amaryllis bulbs in September so I can have them blooming for the holidays (seems like they always bloom right after the holidays), but I missed this one:

Surprise Amaryllis!
After I admired the flowers, I had to get to work. There was a lot to do! I spent most of yesterday afternoon pulling up pansies (and weeds) to make way for summer annuals. Today, I finally trimmed back the tea olive (I hated to cut them while they were blooming, so I just now got around to this task). Then I planted some zucchini and basil. Right. In. The. Front. Yard. Yes, people, I am a rebel. I figured 1) I’ve already got the tomato teepee, so I’m not destroying any fancy aesthetic by adding more veggies; 2) zucchini and basil are pretty; 3) there aren’t any draconian anti-vegetable restrictive covenants in my neighborhood (as far as I know); and 4) I was out of room in the raised beds.
I planted my dahlias right behind the zucchini and basil. I had dug up the dahlia tubers last fall and then started them in pots in March. I planted all of the ones that had shoots (only one didn’t—oh, well). I’m trying a new approach to weed maintenance: newspaper and pinestraw. That’s right. My Ledger-Enquirers will serve an important second purpose: weed barrier. I have tested this approach in several areas in the past, and it really does work for about a season. So I’ve decided to expand.
Why newspaper when the stores sell fancy weed barrier fabric? Friends, I’ve tried the fabric, and I’m here to tell you: don’t waste your money. Weeds are going to grow on top of the fabric after a year or two anyway. It’s a pain in the neck to cut holes when you want to plant something in the fabric covered area. And it’s expensive. Newspaper just lasts a season, but it’s easy to cut, and it’s free. If I want something a tad more durable–like for paths between my raised beds–I use cardboard or old towels and sheets that are too grungy for Goodwill.
A couple of pointers. The Ledger-Enquirer is so thin that I just lay out a whole section at a time. I find that it’s helpful to have a hose handy, particularly on a windy day. After I lay a few sections of newspaper, I wet them so they don’t blow away. Also, after experimenting with several different methods, I’ve determined that the best method is to cover the bed in newspaper and pinestraw, THEN plant the plants. Here is the finished product:

Zucchini, Basil, Dahlias, Knock-Outs, and Tomatoes
After I got the zucchini/basil/dahlia bed done, I used a similar approach with my strawberries and onions. I hope it works! I’ll keep you posted. Happy gardening.
Y’all, there is a freeze warning for parts of Georgia and Alabama tonight. Please check your forecast and take appropriate precautions if the temperature is expected to dip below 32. Walter Reeves advises us to cover tender plants (tomatoes, basil, etc.) with a cotton sheet or a cardboard box. Make sure to remove the cover in the morning when the temperature rises. See http://www.walterreeves.com/landscaping/protecting-plants-from-a-spring-cold-snap/ for more info.
It was a glorious Palm Sunday in middle Georgia. The sun was shining, the sky was blue, and the temperature was just about perfect. After an excellent church service at The Ridge, I spent most of the day in the yard.
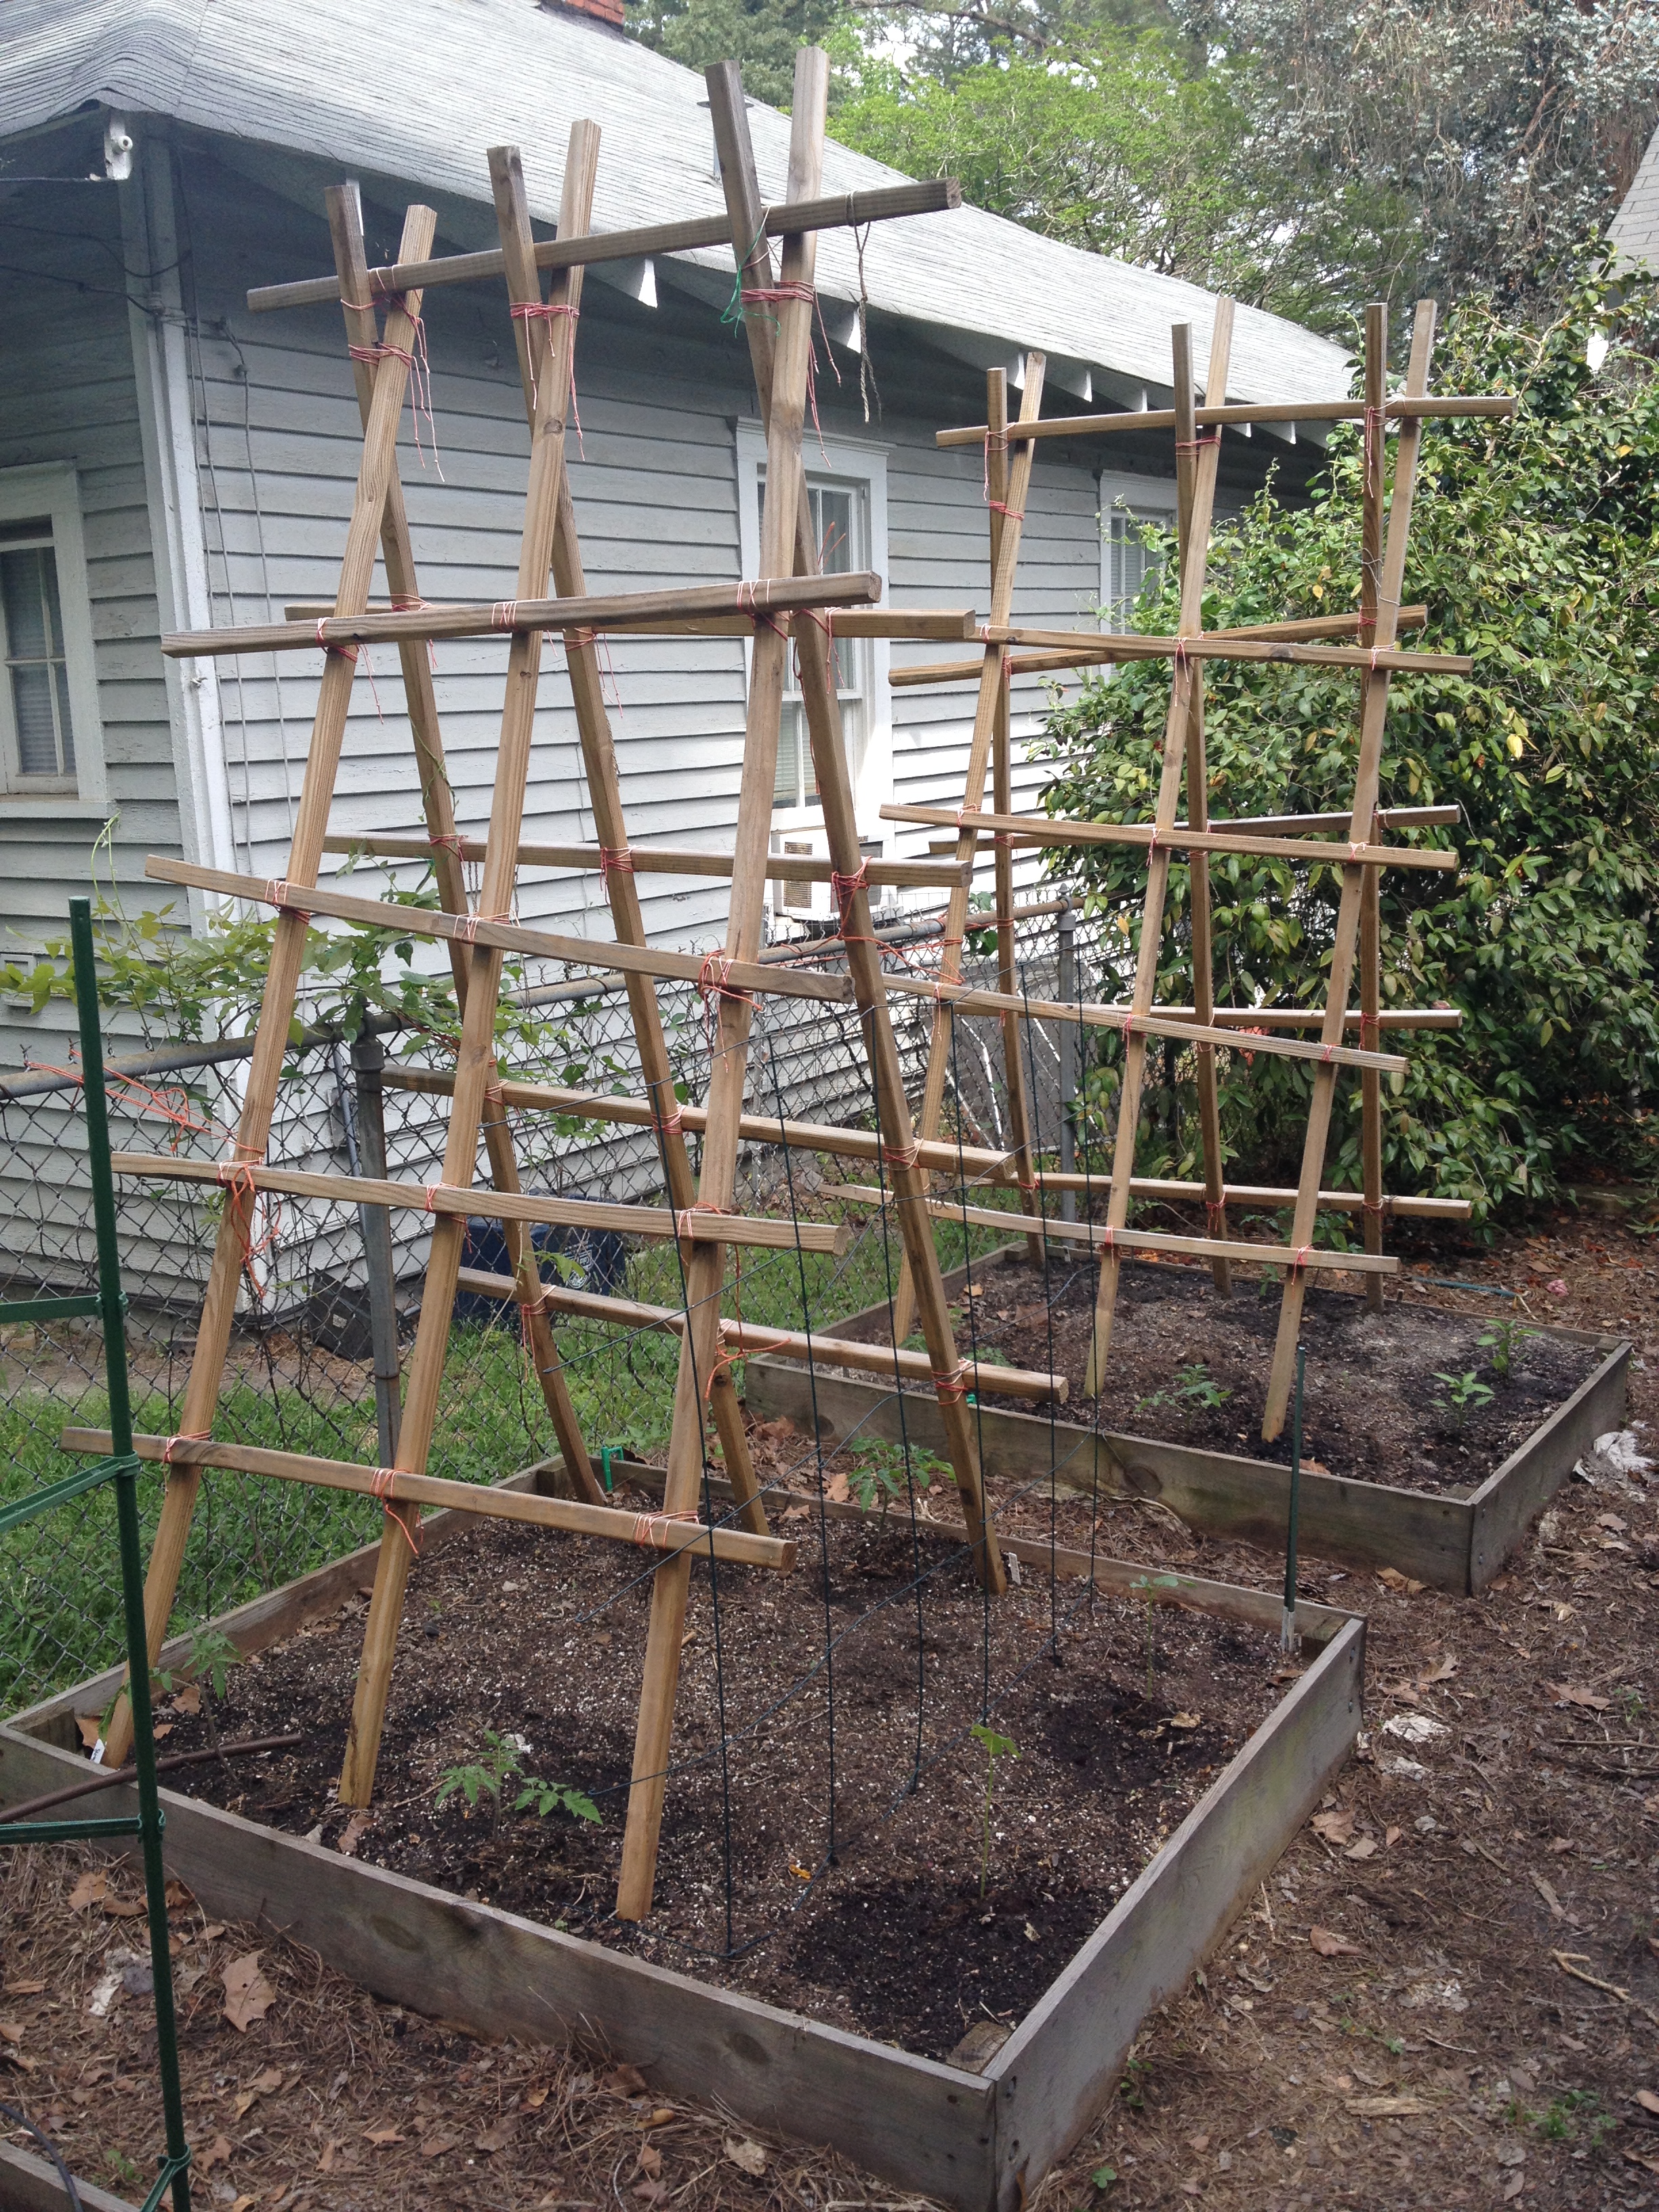
Today, I focused on finishing my vegetable supports. Most of the vegetables we love will sprawl all over the place if we do not provide them with some support. And the best time to install the supports is before your sweet precious vegetables are in the ground. I’ve admitted this before: I decapitated a tomato plant when I tried to build a support structure around it. So now, I make sure my plants stay out of the construction zone. Supports go in first, then the plants.
First, let’s talk tomatoes. Most folks know that they need support. The stores sell contraptions called “tomato cages.” I should just buy a few of those for my tomatoes, right? Um, NO. Friends, those cages are great for many things, but if you’re growing anything other than a dwarf tomato, you’ll need something a whole lot taller than a three or four foot cage. Indeterminate tomato plants get to be seven or eight feet tall (or taller).
So what should you do? Well, you could use a simple old stake. A long piece of bamboo or a long wooden stake ought to do it. Just take some jute twine and tie the tomato plant to the stake as it grows. I used the stake system (just like my Daddy did) for several years, and it worked just fine.
When I started growing more than a few tomato plants, I decided that I should look into other options. Coincidentally, Southern Living ran an article on building your own tomato ladder (I have no clue when the article actually ran—I am usually a few years behind on my reading—but miraculously, I picked up an issue of Southern Living, and there it was). According to Southern Living, you just get a few two-by-twos, have the nice man at Home Depot cut them to the proper size, tie them together, and stick them in the ground. You’ll be done in half an hour. Pretty accurate except the half an hour part. Perhaps I’m just slow with knots. I did LOVE the result, though. The tomatoes grew right up the ladder (and, in the case of the Juliets and Black Plums, over the ladder and down the other side). Maintenance and harvest were easy. I used pressure treated wood, so I just left the structures in the ground. Mama said the hot pink mason line I used to tie the two-by-twos together was tacky; fortunately, it has faded a bit.
Tomato Ladders
This year, I decided to build another ladder for tomatoes and possibly pumpkins. And I thought I’d take advantage of the southern side of my house, which gets good light. I was greatly inspired by the book Vertical Gardening by Derek Fell. It is an excellent book with many ideas (I’m still a little overwhelmed by all the options). The single most important piece of advice Mr. Fell gave: use bamboo to save money! Mr. Fell, you changed my life. Thank you. I do not have any bamboo on my tiny lot, so I asked my friends if they had any. Turns out a lot of folks have bamboo, and they’ll be happy to let you come cut it. My sweet friends Brooke and Brandon told me, “our bamboo is your bamboo,” so I’ve been up to their lovely bamboo forest twice, and I think I’m set for now. Note: harvesting bamboo is a pretty good workout. Make sure your loppers are sharpened before you attempt it!
I built three bamboo structures to go next to the house. Two of them will support tomatoes, and the third will support butternut squash and spaghetti squash. I also built one large bamboo ladder/tent structure. The tent was originally ten feet tall, and my next door neighbors asked if I was planning to have a tribal meeting sometime soon, so I did cut it down a little. Now, I’ll actually be able to reach the tomatoes at the top without a ladder. My tennis coach gave me an old tennis net that otherwise would have gone into the trash (thanks, Mark!). I put that on one side of the ladder, and that is where my pumpkins will climb. The net-free side of the ladder is more tomatoes.

New “Tent” Ladder for Pumpkins and Tomatoes
Now that you know about some great ways to support your tomatoes, you may be wondering what you can do with those tomato cages. I use a three sided, four foot tall tomato cage for my cucumbers. It works great! And I use those round tomato cages for sweet peppers and eggplants. They’re also great for monarda (bee balm).

Good Use for “Tomato” Cages: Peppers and Eggplants
The only other special support I use in the garden is the support Daddy and I built for my pole beans (it also comes in handy for snow peas). The support is basically a frame of one-by-twos with kennel wire stapled to it. It would be cheaper to use netting instead of kennel wire, but I had the kennel wire left over from another project, so I went ahead and used it. The two bean supports I have were built four or so years ago, and they are still in good shape.
After I worked on the support structures, I finished planting my vegetables. Then I spent some time weeding (surprise!). While I weeded and planted, I came across some Japanese beetle grubs.

Japanese Beetle Grub
They are not “good bugs,” so I killed them.
I’m pretty wiped out from today’s work, so I’ll sign off. Hope you had a marvelous weekend. Happy gardening!
In case you haven’t heard, we are expecting a freeze TONIGHT, March 25, in middle Georgia. So, if you have started hardening off your summer annuals outside, double check your local forecast. If you’re expecting below the low 30s, bring those babies inside! And if you got a little ahead of the weatherman and already planted your tomatoes, be sure that you cover them tomorrow evening.
I went ahead and brought in my plants yesterday evening. They will go back outside later in the week. But for now, they have taken over the dining room.
I hope you and your plants weather the freeze!
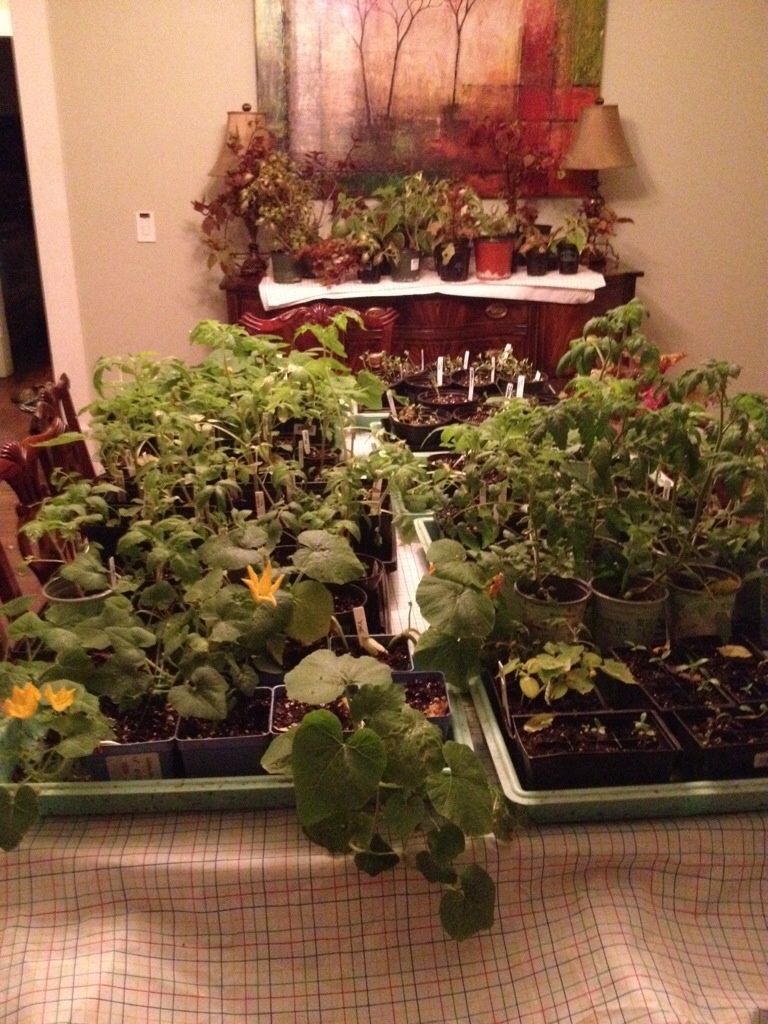
Happy Spring, y’all!
I started my tomato and pepper seeds indoors back in January, and I started some other vegetables in February. These veggies have been living in the lap of luxury in my laundry room—a constant, warm temperature, regular watering with a light stream of tepid water, and gentle yet effective lights.
Now, it is time to prepare my plants for the harsh realities of the world. They will have to be tough to make it out there, where the temperature fluctuates, cold rain pours, wind blows, and the sunlight is a lot more intense than a little fluorescent shop light.
Obviously, I should not just go ahead and move the plants into the direct sunlight of the vegetable garden. They need to be moved gradually so they have a chance to adjust. This process is called “hardening off.” And it is very, very important. I learned this lesson the hard way. During the first year of my vegetable garden, I grew some beautiful tomato plants from seed, and I was itching to get them into the ground. So I took them from the laundry room where they had been coddled for two months and planted them directly in my raised beds. Big mistake. On their first day outside, the sun badly burned the leaves. Though the plants eventually recovered, my mistake cost me about a month of tomato production time. I will never make that mistake again.
Now, I have a five-step process for hardening off my plants. First, I have to figure out when to start hardening off. A lot of considerations are factored into the calculus of exactly when to start hardening off. There’s the date (are we within a week or two of our 50% frost date?). There’s the weather (is there a threat of a frost? will the temperatures generally be in the mid-40s or above at night? are we expecting a monsoon?). There’s the soil temperature (is it getting close to 60°F?). In general, I try to start hardening off the plants a week or two before our 50% frost date, which is March 23 in my part of Middle Georgia. But if it looks like there will be a frost or a bad storm, I will wait.
After I calculate my hardening off start date, I’m ready to move to steps two through five. Step Two: I start the hardening off process in the carport.

Step Three: after a couple days in the carport, I move the plants to a shady part of my deck. Step Four: after a couple days there, I move the plants to a partly sunny part of the deck. Step Five: after a few more days, I move the plants to a slightly sunnier part of the vegetable garden. And then, after a few more days, the plants are sufficiently hardened off and ready to be moved to their beds. Right now, my plants are somewhere between Step Two and Step Three (sorry – I forgot to take a picture).
While you’re hardening off your plants, be careful to watch the weather reports. If you know there will be a bad storm, you probably want to bring the plants under cover—or at least out of the path of potential falling branches. And watch the nighttime temperature. In the 40s, tomatoes and peppers will probably be okay. But not okra. Last weekend, the nighttime temperatures dipped into the low 40s, and my smallest okra showed serious signs of distress, so it and its brethren are now back inside for a few more days.
The fine folks at the Weather Channel are predicting overnight lows in the low 30s in Middle Georgia on Tuesday and Wednesday of next week; I will keep an eye on the predictions. If the temperatures do get that close to freezing, I will need to schlep everything back inside at night.
Good luck with your own tough love!
Hello, friends. I planted my tomato seeds in late January/early February, and I promised you an update. I hope your own seedlings are doing well. Here is how mine are doing:

Tomato Seedlings as of February 25, 2013
As you can see, most of them sprouted and have developed at least one set of real leaves. Unfortunately, no Green Zebras or Sweet Millions have emerged, so I have to decide whether to plant some late seeds. If I do (and if they actually germinate this time), then the plants will not be ready to plant outside until April.
Here is my second flat, which has tomatoes and peppers and was planted a couple weeks after the first flat:

Jack “warms” the tomato and pepper seedlings.
My cat Jack decided that bottom shelf under the shop light/on top of the seedlings would be a great place to nap. Oh, well. Most of the tomatoes had barely emerged, so I did not lose any. I’ve yet to see a pepper, which concerns me a little. Perhaps I need to bring out the heat mat.
By the way, the local big box stores already have tomatoes! Right now, there are not too many varieties. I’m fairly sure that the ground is too cold for tomatoes (they need a ground temperature of 60° F), plus the weather folks predict that we will have frost this weekend in some parts of Middle Georgia. But if you just can’t resist buying a tomato plant, at least go ahead and replant it in a gallon pot and keep it watered. If you don’t have a cold frame, bring that baby inside on Saturday.
Happy growing!
I have an evil nemesis. It is not the mean girl from church who told me during middle school that I must be stupid because I went to public school. It is not the smokers who seem to view the sidewalk in front of my house as their drive-by ashtray. It is not the folks who thought it was a good idea to let a chinaberry tree grow in my yard (this was not a good idea; chinaberries are quite invasive and should not be used in Southern yards on purpose). It is not even a person. My evil nemesis is an insect called the squash vine borer. I’m not alone—several readers have expressed concern about the squash vine borer, and I will try to answer your questions in this post.
The squash vine borer (Melittia satyriniformis or Melittia cucurbitae) wreaks havoc on squash and gourd plants. As Jessica Walliser notes in her excellent book entitled Good Bug, Bad Bug, “Unfortunately, most gardeners don’t notice borer damage until it’s too late.” In other words, if a squash vine borer attacks your garden, you have a beautiful zucchini plant one day and a wilted mess of sadness the next. To you, it may seem to happen overnight, but this horticultural murder is definitely premeditated. What happens is this: one day in late May, a black and orange moth that looks kind of like a wasp emerges from her cocoon. She meets a boy moth. One thing leads to another, and the girl moth lays some eggs on the vine of your squash plant. The eggs hatch, and some little white larvae emerge. Don’t be fooled by their diminutive size; the larvae are killers, and your squash plant is their all-you-can-eat buffet. The larvae bore their way into the stem and feast on the flesh, killing the plant from the inside. Your plant dies, you cry, and then you notice the tell-tale sawdust-like residue at the base of the vine, and you clench your fists and yell to the heavens, “why, why, why?” (At least that’s my reaction.) Then the larvae, finally finished with their gluttonous rampage, settle down into the soil as pupae. When spring arrives, they undergo a metamorphosis and turn into the aforementioned black and orange moth. And so the cycle continues.
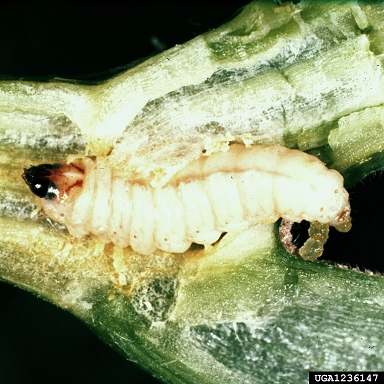
Squash Vine Borer. Photo courtesy of Clemson University – USDA Cooperative Extension Slide Series, Bugwood.org
For more photos, see http://bugguide.net/node/view/11810
How can you stop this evil insect? Everyone from Walliser to Walter Reeves says that prevention is key. Here are the universally acknowledged methods of preventing the heartbreak of a squash vine borer infestation.
* Get a Move On.
If it is possible, rotate your crops. Don’t plant squash in the same place for three or so years.
* Keep it Clean.
Well before you plant your first squash of the spring, make sure you have removed all of the old squash vines from your garden. That way, any larvae still in the vines will be removed from your garden. In late winter, till the area to expose any larvae/pupae that have settled down into the soil. Your friendly neighborhood birds should take it from there.
* Plant Early and Often.
Plant your squash as early as the weather allows (read: as soon as your soil hits 60° F and you think that frost is unlikely). The adult moths don’t emerge until early summer, so if you plant early enough, it’s possible that you’ll be sick of squash before the larvae launch their attack. And plant your squash throughout the season. Late plants may also miss the attack.
* Put Up Barriers.
There are lots and lots of recommendations, but the basic concept is the same: minimize how much space is available for the moth to lay her eggs. Some options:
* Search and Destroy.
Be on the lookout for the various stages of the squash vine borer. Show no mercy.
* Go Nuclear.
As a master gardener, I was taught to take an “integrated pest management” approach to insect control. That is because 95% of bugs are good or at least benign. We need bees and butterflies to pollinate our veggies. We need ladybugs to kill aphids. We need assassin bugs, praying mantises, and spiders to kill a whole mess of pests. Most insecticides kill the good guys along with the bad guys. And guess who bounces back first (hint: it’s not the good guys). So I try to use insecticides as a last resort. That said, if you can’t get the plants in early or if you always seem to be attacked by squash vine borers, you can try an insecticide. Walter Reeves suggests either a weekly application of carbaryl powder to the base of the stems or spraying with acetamiprid. Remember to read the directions! And note: once the borer has entered the vine, it’s too late for the insecticide to work. So take that into account when you’re devising your regimen.
Final Thoughts
One reader asked if she should consider removing an area of her soil and replacing it. This proposal has some appeal—as discussed above, the pupae of squash vine borers settle down in our soil for a long winter nap. In the spring, the pupae turn into adults and make their above-ground debut just in time for squash season. That said, removing and replacing soil seems like an awful lot of work, particularly given that it would only stop the reader’s homegrown grubs. In its adult form, a squash vine borer is a moth that could simply fly over to the reader’s yard and lay its eggs. So I’m reluctant to suggest the removal/replacement approach until she has exhausted the other, less dramatic alternatives, starting with crop rotation, tilling, and preventive barriers.
Now that we’re all armed with this information, I feel much better about our chances against the squash vine borer this year. I’ll keep you posted on my progress. Please keep me posted on yours!
