Y’all, there is a freeze warning for parts of Georgia and Alabama tonight. Please check your forecast and take appropriate precautions if the temperature is expected to dip below 32. Walter Reeves advises us to cover tender plants (tomatoes, basil, etc.) with a cotton sheet or a cardboard box. Make sure to remove the cover in the morning when the temperature rises. See http://www.walterreeves.com/landscaping/protecting-plants-from-a-spring-cold-snap/ for more info.
Support the Cukes!
It was a glorious Palm Sunday in middle Georgia. The sun was shining, the sky was blue, and the temperature was just about perfect. After an excellent church service at The Ridge, I spent most of the day in the yard.
Today, I focused on finishing my vegetable supports. Most of the vegetables we love will sprawl all over the place if we do not provide them with some support. And the best time to install the supports is before your sweet precious vegetables are in the ground. I’ve admitted this before: I decapitated a tomato plant when I tried to build a support structure around it. So now, I make sure my plants stay out of the construction zone. Supports go in first, then the plants.
First, let’s talk tomatoes. Most folks know that they need support. The stores sell contraptions called “tomato cages.” I should just buy a few of those for my tomatoes, right? Um, NO. Friends, those cages are great for many things, but if you’re growing anything other than a dwarf tomato, you’ll need something a whole lot taller than a three or four foot cage. Indeterminate tomato plants get to be seven or eight feet tall (or taller).
So what should you do? Well, you could use a simple old stake. A long piece of bamboo or a long wooden stake ought to do it. Just take some jute twine and tie the tomato plant to the stake as it grows. I used the stake system (just like my Daddy did) for several years, and it worked just fine.
When I started growing more than a few tomato plants, I decided that I should look into other options. Coincidentally, Southern Living ran an article on building your own tomato ladder (I have no clue when the article actually ran—I am usually a few years behind on my reading—but miraculously, I picked up an issue of Southern Living, and there it was). According to Southern Living, you just get a few two-by-twos, have the nice man at Home Depot cut them to the proper size, tie them together, and stick them in the ground. You’ll be done in half an hour. Pretty accurate except the half an hour part. Perhaps I’m just slow with knots. I did LOVE the result, though. The tomatoes grew right up the ladder (and, in the case of the Juliets and Black Plums, over the ladder and down the other side). Maintenance and harvest were easy. I used pressure treated wood, so I just left the structures in the ground. Mama said the hot pink mason line I used to tie the two-by-twos together was tacky; fortunately, it has faded a bit.
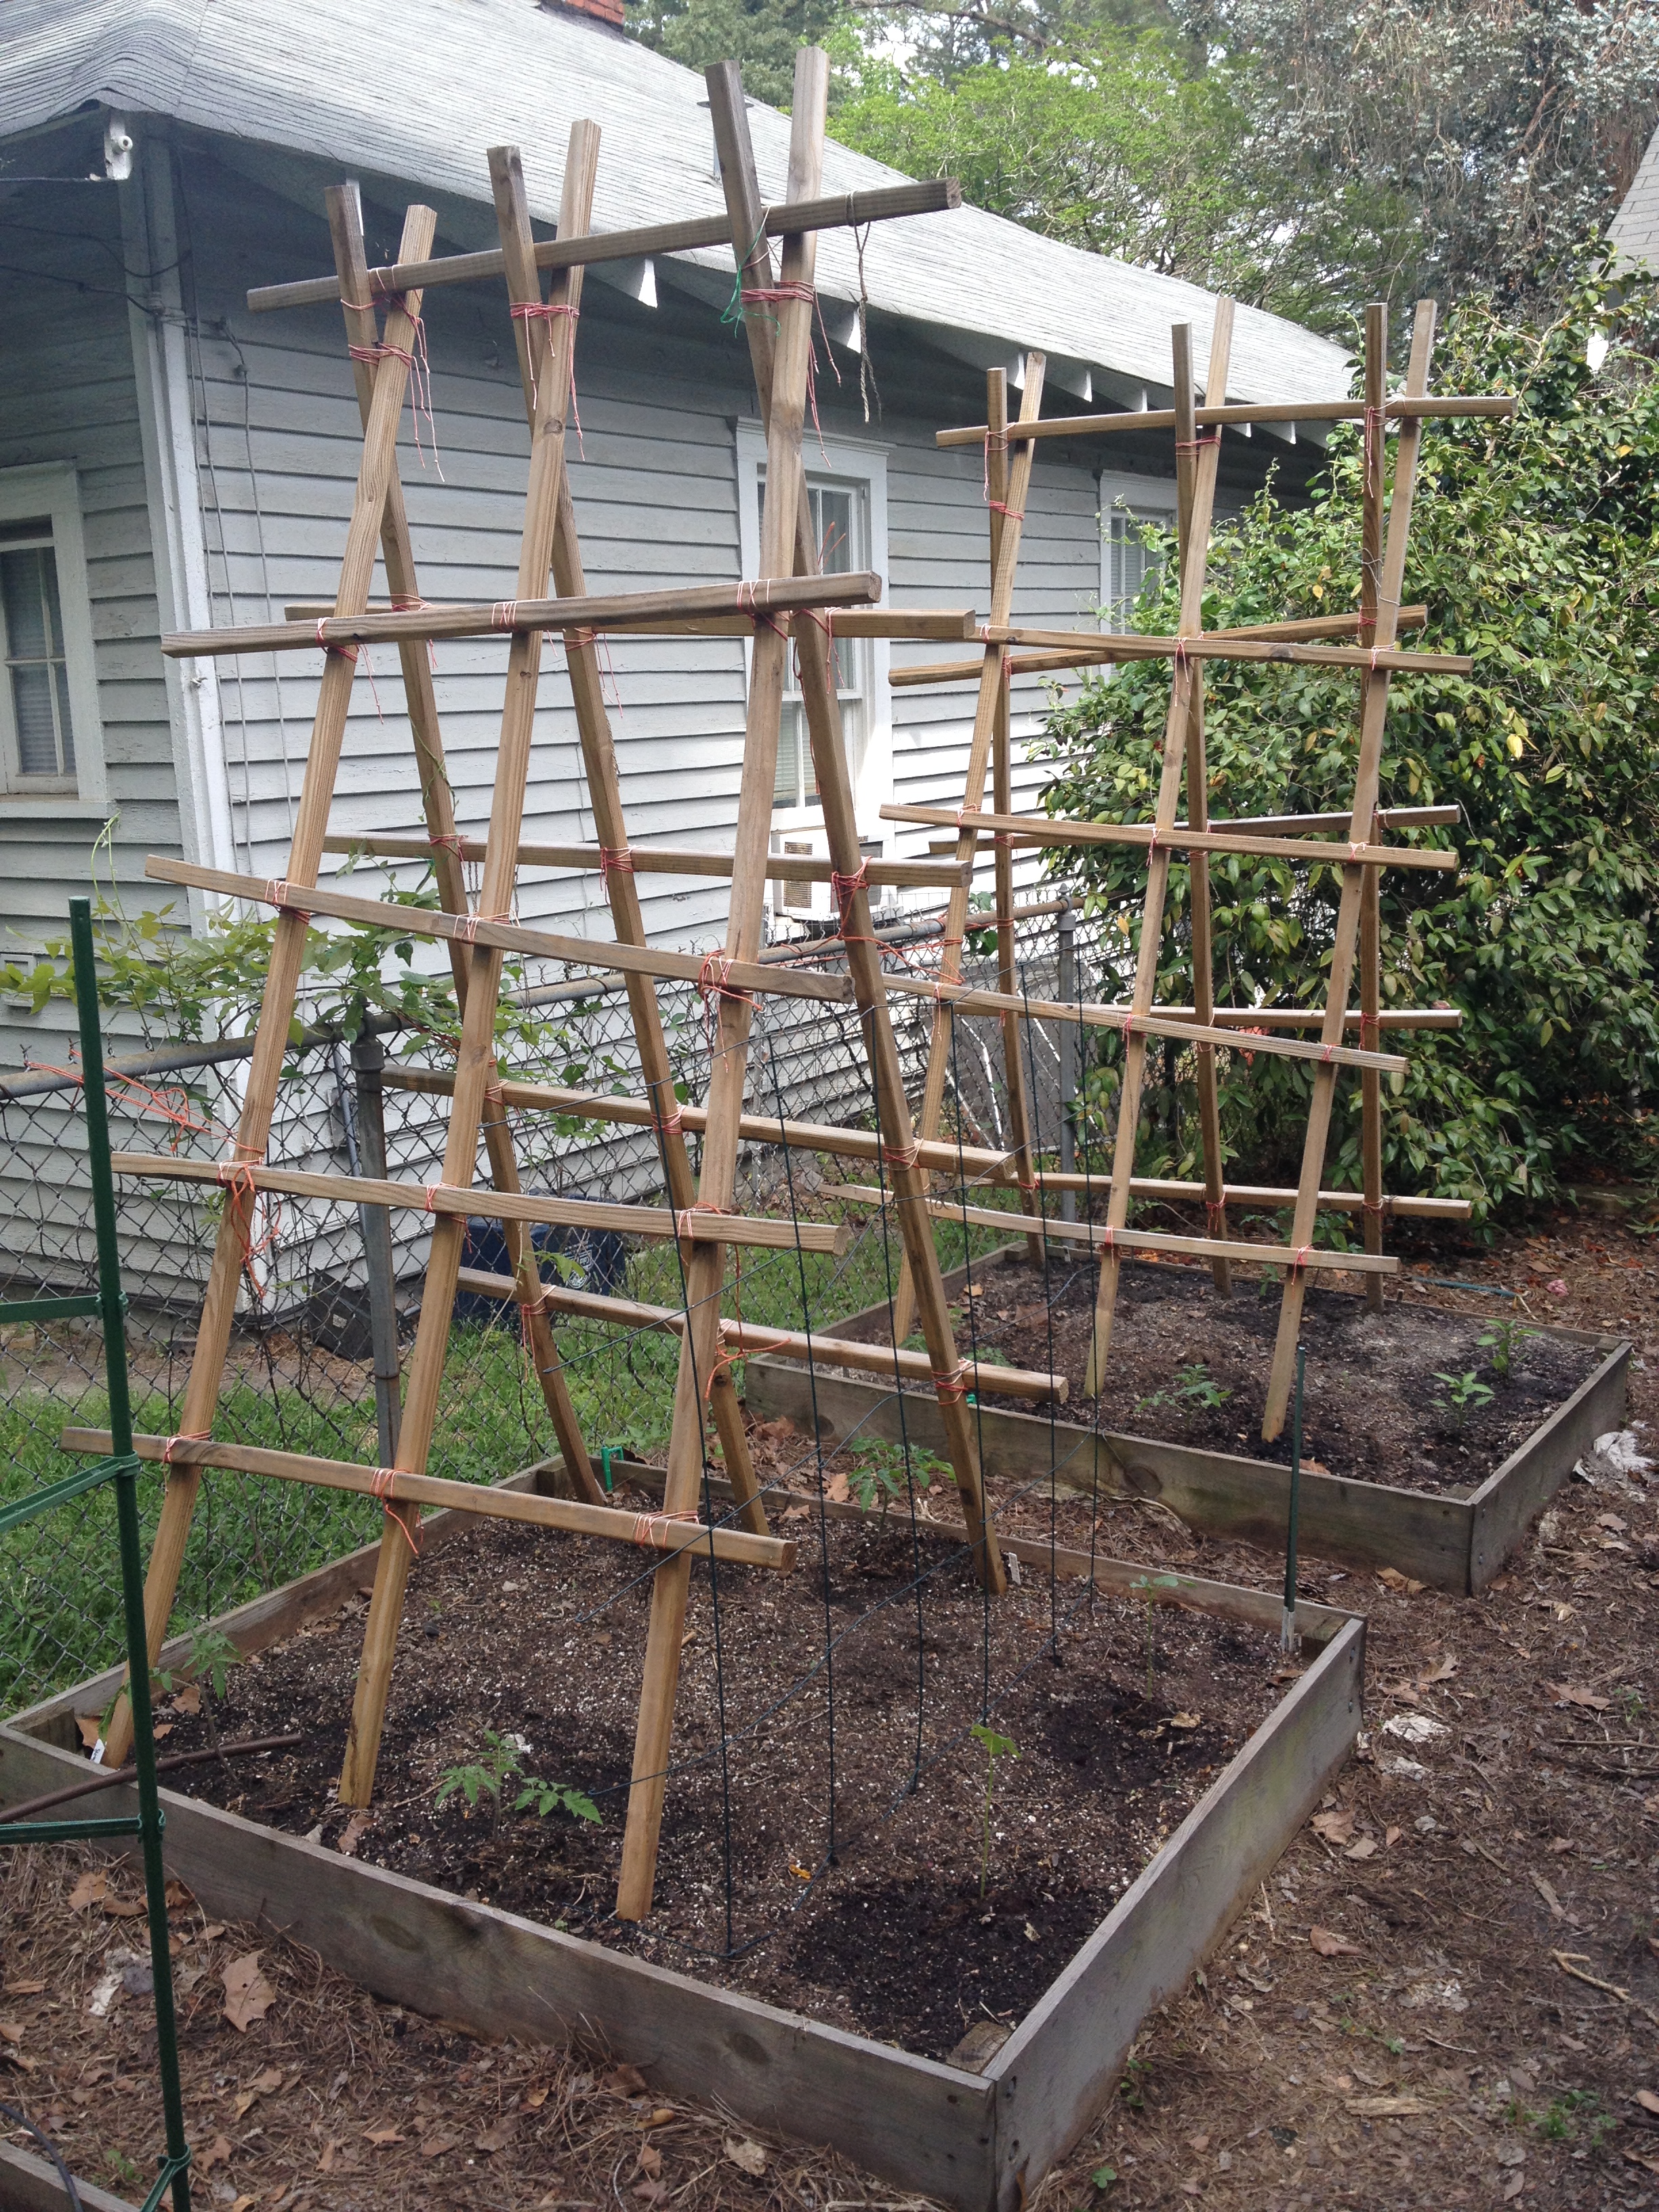
Tomato Ladders
This year, I decided to build another ladder for tomatoes and possibly pumpkins. And I thought I’d take advantage of the southern side of my house, which gets good light. I was greatly inspired by the book Vertical Gardening by Derek Fell. It is an excellent book with many ideas (I’m still a little overwhelmed by all the options). The single most important piece of advice Mr. Fell gave: use bamboo to save money! Mr. Fell, you changed my life. Thank you. I do not have any bamboo on my tiny lot, so I asked my friends if they had any. Turns out a lot of folks have bamboo, and they’ll be happy to let you come cut it. My sweet friends Brooke and Brandon told me, “our bamboo is your bamboo,” so I’ve been up to their lovely bamboo forest twice, and I think I’m set for now. Note: harvesting bamboo is a pretty good workout. Make sure your loppers are sharpened before you attempt it!
I built three bamboo structures to go next to the house. Two of them will support tomatoes, and the third will support butternut squash and spaghetti squash. I also built one large bamboo ladder/tent structure. The tent was originally ten feet tall, and my next door neighbors asked if I was planning to have a tribal meeting sometime soon, so I did cut it down a little. Now, I’ll actually be able to reach the tomatoes at the top without a ladder. My tennis coach gave me an old tennis net that otherwise would have gone into the trash (thanks, Mark!). I put that on one side of the ladder, and that is where my pumpkins will climb. The net-free side of the ladder is more tomatoes.

New “Tent” Ladder for Pumpkins and Tomatoes
Now that you know about some great ways to support your tomatoes, you may be wondering what you can do with those tomato cages. I use a three sided, four foot tall tomato cage for my cucumbers. It works great! And I use those round tomato cages for sweet peppers and eggplants. They’re also great for monarda (bee balm).

Good Use for “Tomato” Cages: Peppers and Eggplants
The only other special support I use in the garden is the support Daddy and I built for my pole beans (it also comes in handy for snow peas). The support is basically a frame of one-by-twos with kennel wire stapled to it. It would be cheaper to use netting instead of kennel wire, but I had the kennel wire left over from another project, so I went ahead and used it. The two bean supports I have were built four or so years ago, and they are still in good shape.
After I worked on the support structures, I finished planting my vegetables. Then I spent some time weeding (surprise!). While I weeded and planted, I came across some Japanese beetle grubs.

Japanese Beetle Grub
They are not “good bugs,” so I killed them.
I’m pretty wiped out from today’s work, so I’ll sign off. Hope you had a marvelous weekend. Happy gardening!
Haiku for Chinese Snowball Viburnum
Beautiful blooming
Chinese Snowball Viburnum
takes my breath away

Why I Play in the Dirt
As I wandered around the yard last night looking at all the work that needs to be done, I took a little time to look at the flowers. After all, I spend a ton of time gardening so I will have beautiful flowers (and healthy fruits and veggies) to enjoy. Here are some of my favorite blooms from yesterday.


Fun with Hypertufa!
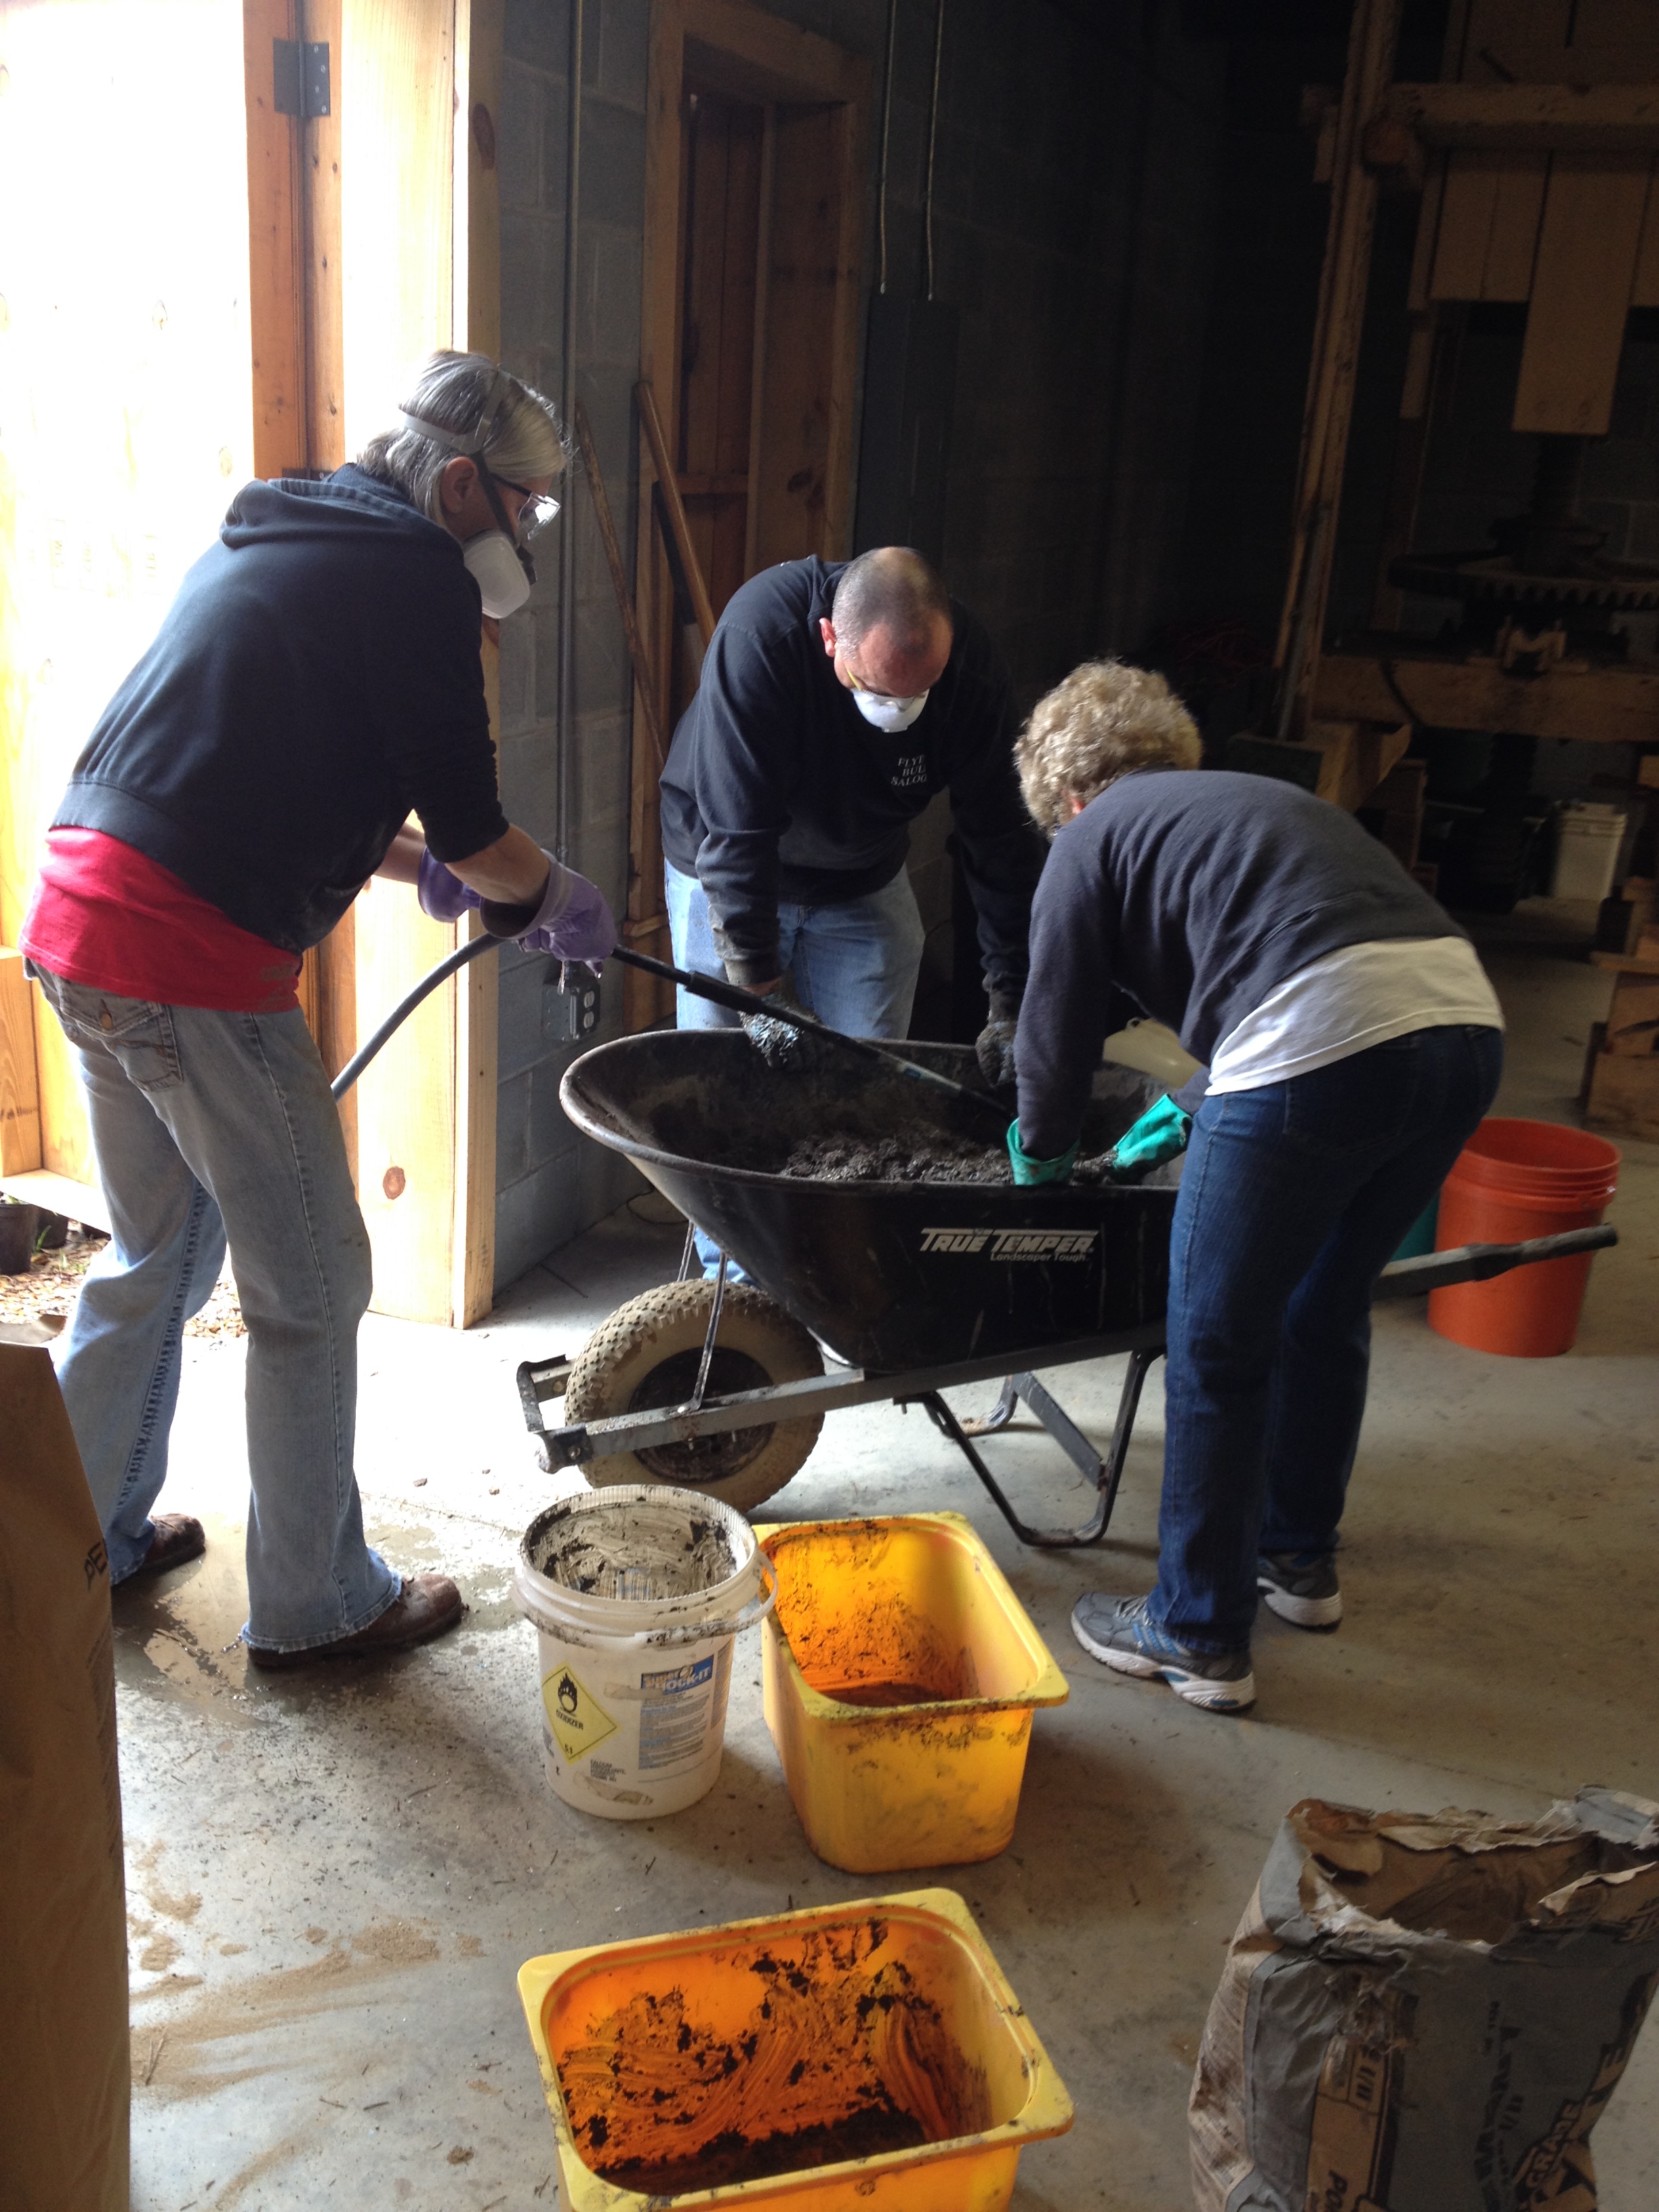
Last Saturday, I attended an exciting workshop on hypertufa at the Columbus Botanical Garden. Toni Fogle, a lawyer-turned-hypertufa enthusiast, taught a gaggle of ladies and one gentleman how to craft our own (relatively) lightweight stone-like containers. We had a super time getting dirty and sculpting our vessels.
Ms. Fogle learned how to make hypertufa from her mother, who makes hypertufa containers for the Cox Arboretum in Dayton, Ohio. Ms. Fogle now lives in Columbus, is a member of the Azalea Garden Club, and hosts hypertufa workshops at her home. She repeatedly emphasized that she is not an expert, but she sure seemed like an expert to me. She had an answer for every question, and she really knew her stuff!
So what is hypertufa? It is a popular medium for making garden pots, troughs, and ornaments. It has a stone-like appearance but is much lighter. Hypertufa is made of Portland cement and peat, plus either perlite or vermiculite (and maybe sand, depending on the recipe). And when you’re molding it, it’s like Play-Doh for grown ups, y’all.
At our workshop, we used a formulation comprised of 2 parts Portland cement, 3 parts peat, and 3 parts perlite, plus a handful of fiber mesh. A couple notes on the ingredients.
- First, I’ve mentioned before that some gardeners are concerned that peat is becoming an unsustainable resource, so I wondered whether a peat substitute could be used. Short answer: yes, though the quality of the finished product may be different than a container made with peat. If you’re concerned about peat, you can use coir or a fine grade composted bark.
- Second, I wasn’t sure where to get fiber mesh, which is a reinforcing fiber used in concrete. Turns out you can buy it at amazon.com. Or if you know someone who works in construction, they can probably sell you a bit—it only takes a pinch to make a hypertufa container.
- Third, if you want to buy perlite and vermiculite, the big box stores will charge you an arm and a leg for a tiny bag. If you want to pay an arm and a leg, I suppose that’s your journey. But if you want to be thrifty, go to your local feed and seed store. Columbus folks can just go across the Chattahoochee to B.W. Capps in Phenix City—you can get a 4 cubic foot bag of perlite for $17.50 and a 4 cubic foot bag of vermiculite for $17.99.
In addition to the ingredients, you’ll need safety equipment, mixing container, a sturdy table, a plastic tablecloth, a form, some plastic bags grocery store bags with handles, and a large plastic trash bag for each form.
- Safety equipment. Hypertufa involves concrete, and you don’t want to breathe in concrete dust or get it in your eyes or your jewelry/watch. So when you are mixing the hypertufa ingredients, leave your jewelry and watch inside and wear safety glasses, a dust mask, and gloves. You can ditch the glasses and mask while you’re molding the hypertufa, but keep on your rubber gloves.
- Mixing container. You need a place to mix the ingredients. A wheelbarrow or a large plastic container will work.
- Sturdy table. It is important to have a sturdy work surface so that your hypertufa doesn’t jiggle a lot while you’re making it. Jiggling leads to cracks.
- Plastic tablecloth. Ms. Fogle recommends plastic tablecloths from the dollar store, although heavy duty plastic drop cloths will also work (but they’re more expensive). The tablecloth has two purposes. First, it covers your workspace so your table doesn’t get messy. Second, when you are finished molding your hypertufa, you will use the plastic tablecloth to cover it.
- Form (or not). You can do free form hypertufa, but the workshop did not cover that. We learned how to make hypertufa using a form. I used a small plastic bowl that was fairly rigid. You could also use a plastic flower pot, a sturdy plastic bag (like a cat litter bag), or even a cardboard box. If you are using an “outside in” approach (molding the hypertufa on the outside of your form), make sure your form doesn’t have a lip. If you are using an “inside out” approach (molding the hypertufa on the inside of your form), make sure your form isn’t too rigid.
- Plastic grocery store bags. You need a plastic grocery store bag or two to cover or line your form. The handles will make it easier to pull out your form when your hypertufa is dry. If your bag seems flimsy, use two.
- Large plastic trash bag. You will use the bag to wrap your hypertufa for drying and seasoning.
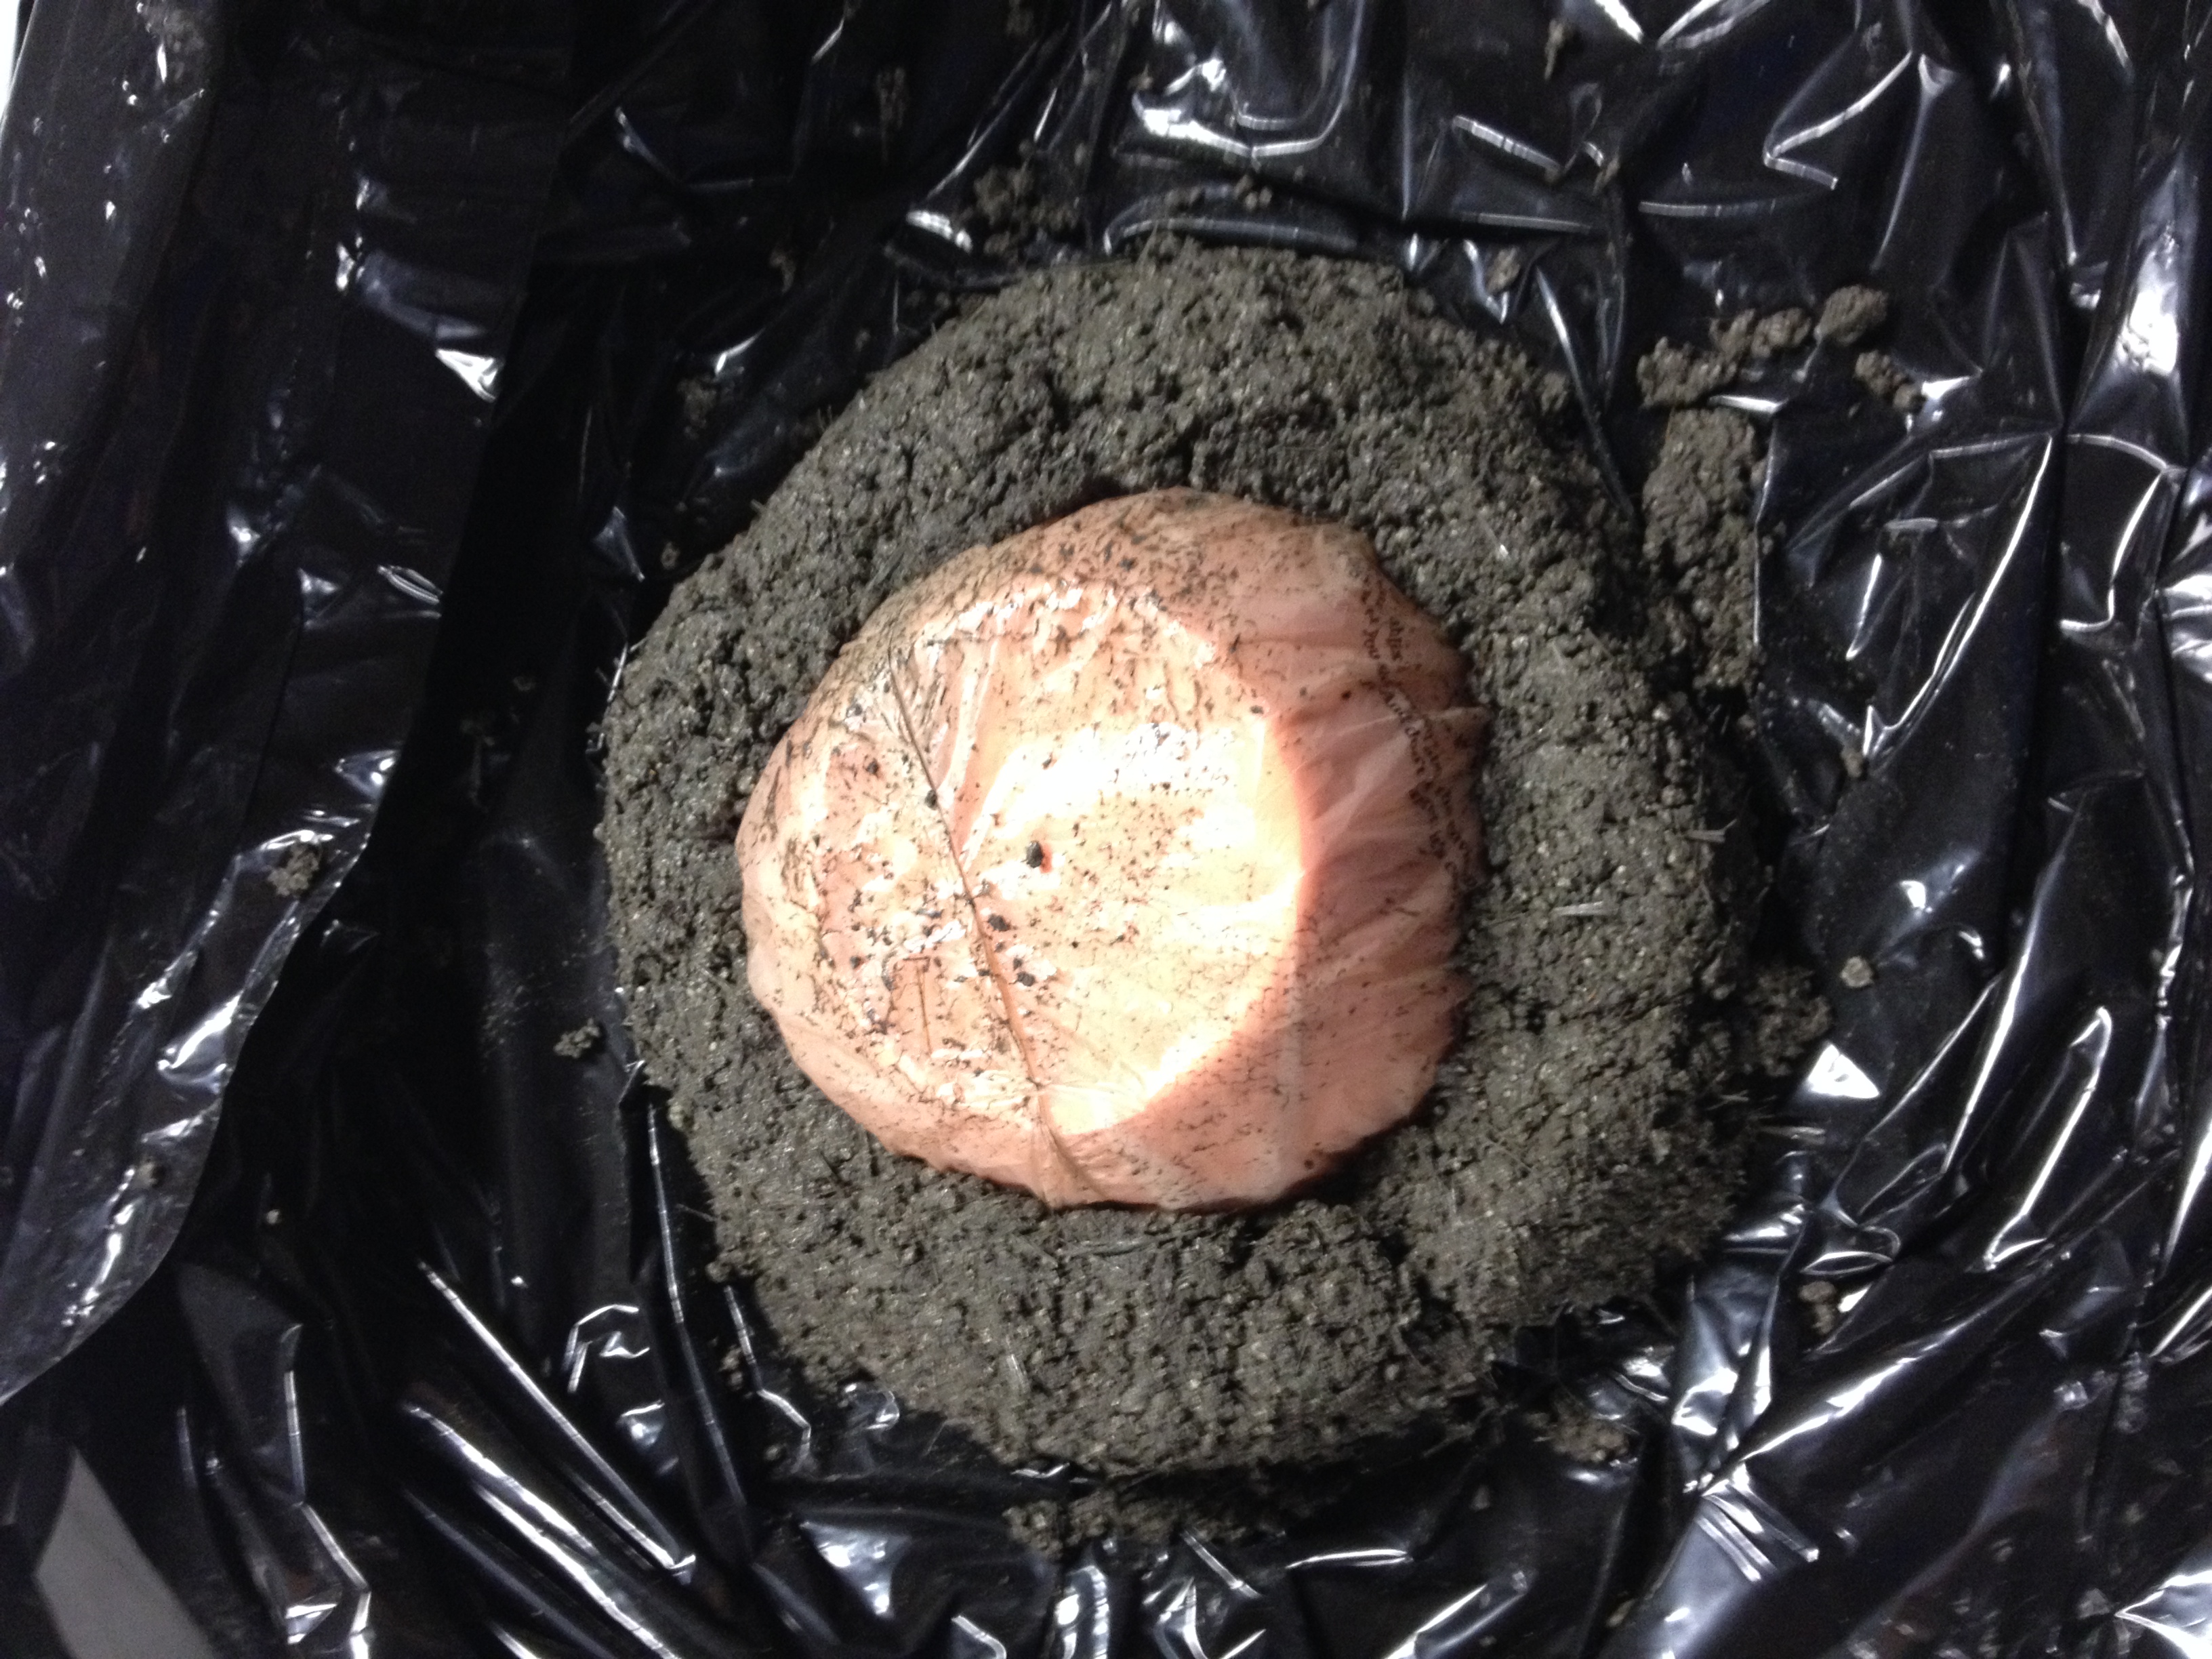
Once you have your gear, you’re ready to start! Before you mix the ingredients, have your form prepared—it should be covered in plastic grocery bags and sitting in your large plastic trash bag.

My Form: a Small, Plastic Bowl

My Form: Wrapped and Ready to Go
Mix your ingredients and slowly add water until your mixture is the consistency of cottage cheese.
Mixing the Hypertufa
Then, when you start, you must keep going until you’re finished. Build from the bottom of your form, keeping a depth of at least 1.5 inches, especially at the corners. You will be tempted to press the mixture with your fingers, but Ms. Fogle recommends focusing on using your thumb to tamp down the mixture while using your fingers simply to hold it in place. If you get puddles of water, you’re squeezing too hard! And when you get to the bottom of your vessel, make sure it is flat. You can use your finger (or a dowel) to check the depth and make a drainage hole.
Getting Started

Finished!

More Hypertufa Artisans
After you finish molding your hypertufa, the waiting begins. Carefully fold the garbage bag over your hypertufa and then fold the plastic tablecloth on top of the garbage bag.

Wrapped and Waiting
Ms. Fogle emphasized that you should not tinker with your hypertufa for at least three days. After three days, you may remove the form (go slowly; note: after a tugging gently, mine popped right out).

Ready to Remove the Form

My Hypertufa!
You can use a steel brush to smooth the surface (Ms. Fogle says that she usually doesn’t bother with this step: “I’m not fancy, I’m lazy”). And then, after that, you need to let the hypertufa season. In other words, let it sit for a month or 45 days covered in plastic (you may want to spritz it with water occasionally during the curing process). Then you can burn off any fiber mesh “whiskers” (Ms. Fogle uses a grill lighter; if you have a blowtorch, go for it). Finally, allow the container to weather outdoors for several weeks. This is not a quick process, but I’m sure it will be worth the wait!
Weekend Update
It was an exciting weekend at my house. The weather was gorgeous, and I was able to get a lot of work done in the yard. I also attended the hypertufa workshop at Columbus Botanical Garden—I’ll give you an update on that as soon as I pick up my beautiful creation later this week. But I know you’re on pins and needles wanting to know what garden tasks I accomplished this weekend, so here is my report.
It is the busiest time of year for me. I am a procrastinator by nature, so I usually put off important garden prep work until the last possible minute. Last year, I didn’t even start building my tomato ladders until after my tomatoes were in the ground. Big mistake. I decapitated a poor little Cherokee Purple when I dropped one of the “rungs” on it. And I ran out of steam when it came to weeding an area where I was going to plant tomatoes, so I decided that I would just till it, put down newspaper, and hope for the best. Well, the newspaper did work for a while, but it was no match for the aggressive encroachment of the dollarweed a/k/a pennywort a/k/a the weedy bane of my existence (for me, the only weed worse than dollarweed is chamberbitter a/k/a little mimosa a/k/a gripeweed a/k/a just plain horrible awfulness).
This year, I am determined to do better. And I am happy to announce that I appear to be on the right track. Mainly because the soil temperature hasn’t reached a consistent 65°F, so I haven’t wanted to plant my veggies yet and I’ve had more time for prep work (thank you, cold snap). If you’re not sure whether your soil is warm enough for you to plant, you can just use your meat thermometer. Or you can check http://www.georgiaweather.net/.
Anyway, my two main tasks at this point are (1) weeding and (2) building supports for my vegetables. This weekend was a perfect time for both tasks. The ground was still soft from last week’s rain, so weeds came out of the ground fairly easily and the supports went into the ground without a herculean effort. So I weeded and weeded and weeded. Then I tied together a lot of bamboo. And then I weeded. Then I selected the twenty-one tomato plants (out of the fifty or so I started from seed) that will live in my yard this summer. And then I weeded and weeded and weeded.
You may wonder why I spent so much time weeding. First, I have a lot of weeds. I’ve been lazy about eradicating weeds in the past, plus the two yards behind mine are basically jungles whose weeds send their seeds into my yard. Darn them. Second, if I’ve only learned one thing in my six years as a homeowner/aspiring gardener, it’s that there is no substitute for good old elbow grease when it comes to weeding. I’ve tried weeding-by-tiller. But I still have to pull up the weeds to prevent re-infestation. I’ve tried a weed-whacker. But I wasn’t getting the roots, so the weeds grew back, plus it was easy to maim the plants I wanted to keep. I’ve tried an herbicide. But I accidentally injured or killed some of my good plants when I did. So for me, old fashioned pulling is the way to go. Which means I actually have to do it or I’ll be overrun with weeds before the first tomato plant sets fruit. At times, I feel like Sisyphus—but instead of a boulder and a hill, I have weeds. But if I keep up with it little by little, surely I will prevail. And there is good news on the horizon: some researchers in Nebraska are creating a robot to pull weeds. I am not making this up: http://www.npr.org/blogs/thesalt/2013/02/14/171817006/when-resistance-is-futile-bring-in-the-robots-to-pull-superweeds. Y’all need to know how much I love my three Roombas. So when iRobot comes out with a weed pulling robot, I am going to buy it.
In the next week or so, I will continue weeding, and I will put down some mulch. I will also finish my vegetable supports and then plant my baby vegetables. When things are presentable, I’ll post some photos!
Happy gardening!
Hypertufa Workshop This Weekend!
This Saturday, March 29, 2014, the good folks at Columbus Botanical Garden will show us how to make custom hypertufa containers. For only $35 ($40 for non-members), you will learn how to make your very own piece of outdoor art! The workshop is 10:00 am to 1:00 pm. Bring rubber gloves, a large garbage bag, and a form (e.g., a plastic Rubbermaid container—make sure it’s smaller than one cubic foot). Sign up online: http://columbusbotanicalgarden.com/event/hypertufa-workshop-2/ or call the Columbus Botanical Garden for more information – 706-327-8400. Hope to see you there!

Photo courtesy of Columbus Botanical Garden.
If you can’t make it to the workshop but are interested in learning more about hypertufa, check out:
http://www.marthastewart.com/268091/pots-with-a-personal-touch-hypertufa:
http://www.lowes.com/creative-ideas/woodworking-and-crafts/make-hypertufa-pots/project
Shelter Them
In case you haven’t heard, we are expecting a freeze TONIGHT, March 25, in middle Georgia. So, if you have started hardening off your summer annuals outside, double check your local forecast. If you’re expecting below the low 30s, bring those babies inside! And if you got a little ahead of the weatherman and already planted your tomatoes, be sure that you cover them tomorrow evening.
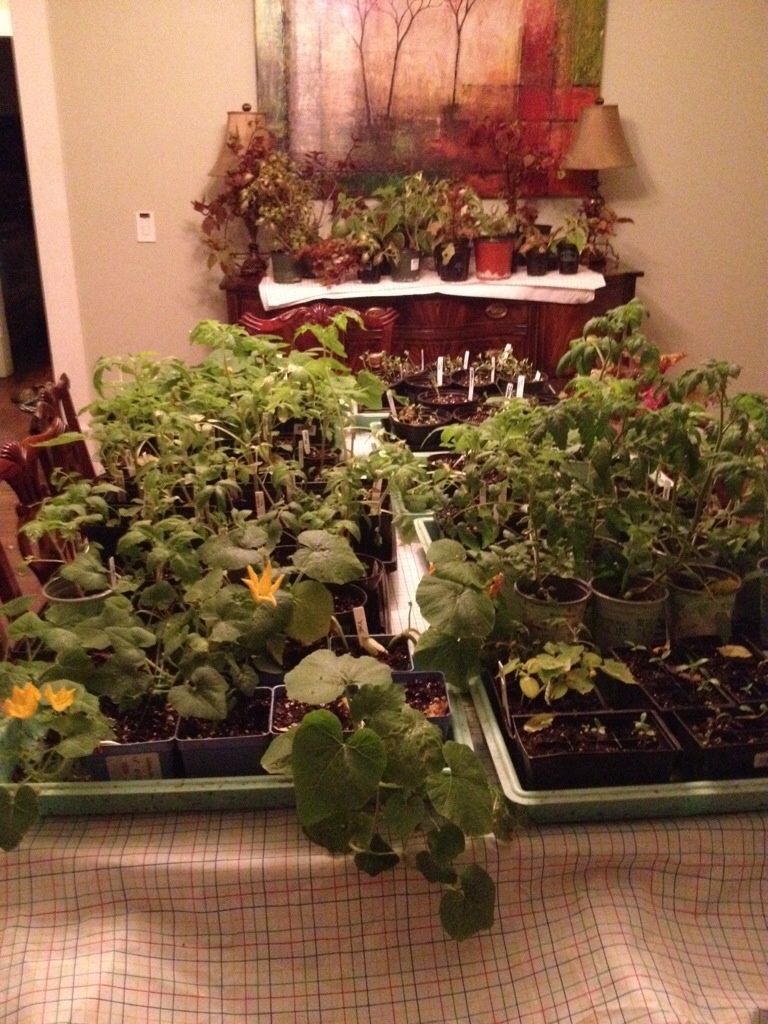
I went ahead and brought in my plants yesterday evening. They will go back outside later in the week. But for now, they have taken over the dining room.
I hope you and your plants weather the freeze!
Tough Love
Happy Spring, y’all!
I started my tomato and pepper seeds indoors back in January, and I started some other vegetables in February. These veggies have been living in the lap of luxury in my laundry room—a constant, warm temperature, regular watering with a light stream of tepid water, and gentle yet effective lights.
Now, it is time to prepare my plants for the harsh realities of the world. They will have to be tough to make it out there, where the temperature fluctuates, cold rain pours, wind blows, and the sunlight is a lot more intense than a little fluorescent shop light.
Obviously, I should not just go ahead and move the plants into the direct sunlight of the vegetable garden. They need to be moved gradually so they have a chance to adjust. This process is called “hardening off.” And it is very, very important. I learned this lesson the hard way. During the first year of my vegetable garden, I grew some beautiful tomato plants from seed, and I was itching to get them into the ground. So I took them from the laundry room where they had been coddled for two months and planted them directly in my raised beds. Big mistake. On their first day outside, the sun badly burned the leaves. Though the plants eventually recovered, my mistake cost me about a month of tomato production time. I will never make that mistake again.
Now, I have a five-step process for hardening off my plants. First, I have to figure out when to start hardening off. A lot of considerations are factored into the calculus of exactly when to start hardening off. There’s the date (are we within a week or two of our 50% frost date?). There’s the weather (is there a threat of a frost? will the temperatures generally be in the mid-40s or above at night? are we expecting a monsoon?). There’s the soil temperature (is it getting close to 60°F?). In general, I try to start hardening off the plants a week or two before our 50% frost date, which is March 23 in my part of Middle Georgia. But if it looks like there will be a frost or a bad storm, I will wait.
After I calculate my hardening off start date, I’m ready to move to steps two through five. Step Two: I start the hardening off process in the carport.

Step Three: after a couple days in the carport, I move the plants to a shady part of my deck. Step Four: after a couple days there, I move the plants to a partly sunny part of the deck. Step Five: after a few more days, I move the plants to a slightly sunnier part of the vegetable garden. And then, after a few more days, the plants are sufficiently hardened off and ready to be moved to their beds. Right now, my plants are somewhere between Step Two and Step Three (sorry – I forgot to take a picture).
While you’re hardening off your plants, be careful to watch the weather reports. If you know there will be a bad storm, you probably want to bring the plants under cover—or at least out of the path of potential falling branches. And watch the nighttime temperature. In the 40s, tomatoes and peppers will probably be okay. But not okra. Last weekend, the nighttime temperatures dipped into the low 40s, and my smallest okra showed serious signs of distress, so it and its brethren are now back inside for a few more days.
The fine folks at the Weather Channel are predicting overnight lows in the low 30s in Middle Georgia on Tuesday and Wednesday of next week; I will keep an eye on the predictions. If the temperatures do get that close to freezing, I will need to schlep everything back inside at night.
Good luck with your own tough love!
Lazy Girl’s Guide to Orchid Maintenance
I get a lot of questions from friends about how to care for plants. The questions about outdoor plants are all over the map (Q: how long will it take my new blueberry bush to produce? A: about 3 years; Q: why did my basil plant turn black? A: it froze; Q: the best thing for my lawn would be to set it on fire and reseed, right? A: Um, wrong.). But the vast majority of questions about indoor plants are about one type: the phalaenopsis orchid. Folks are so worried about what to do with these plants! So today, I would like to dispel some rumors about orchids.
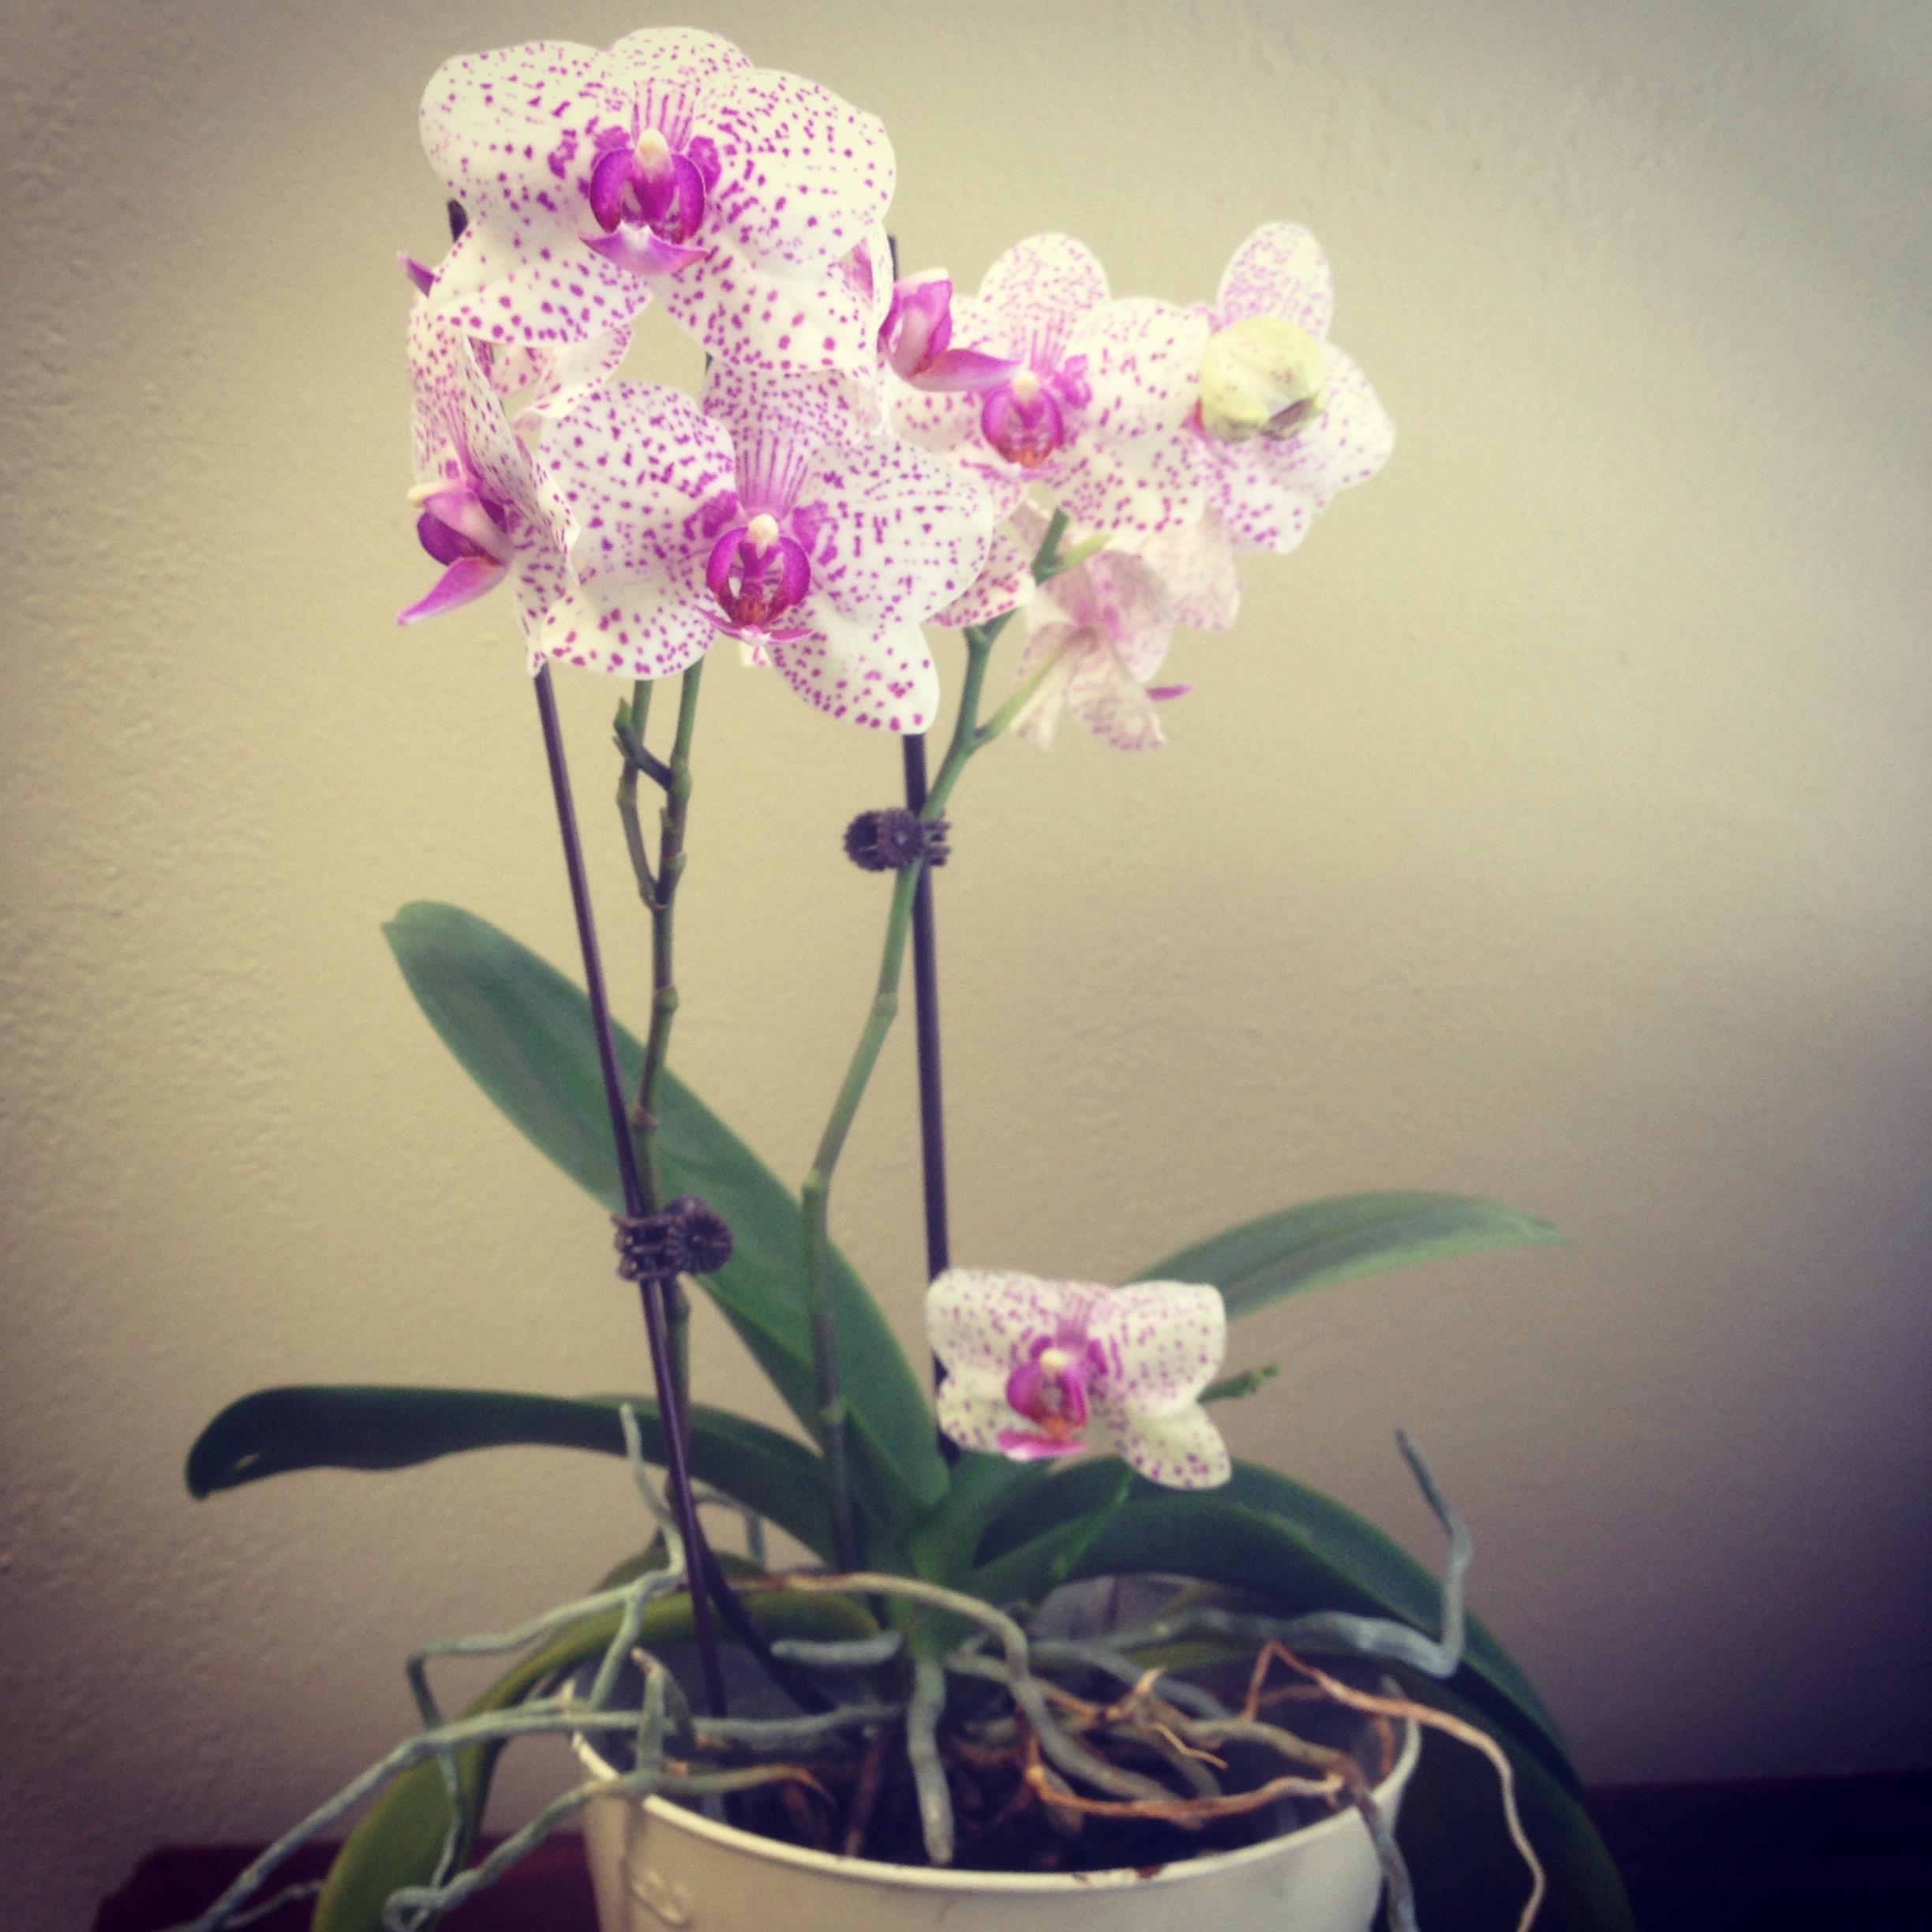
Phalaenopsis orchids (a/k/a moth orchids) are lovely. Their blooms last at least a month. They are widely available at florist shops, grocery stores, and big box stores—especially around Valentine’s Day and Mother’s Day. Phalaenopsis orchids make a wonderful gift, and that gift could last for years (my oldest phalaenopsis is at least ten years old).
Most folks think that orchids are fussy and hard to grow. I too had been led to believe that orchids must be coddled with special light, special fertilizer, and constant care. Hogwash! I have had excellent results without spritzing “just so” or even remembering to fertilize on a regular basis. In fact, all of my phalaenopsis orchids are currently blooming. Do they look exactly like the ones that were carefully raised in a fancy commercial greenhouse? Mercy, no. But they do have flowers, and I think they’re glorious. See?

Here are the major steps I followed. Disclaimer: my “techniques” have not been approved by any extension services or orchid societies. Obviously.
- I put them near a window. Phalaenopsis orchids are great because they don’t require a whole lot of light, and they are happy with the temperature in my house (between 65º F and 80º F, depending on the season). Before I had my shop light set-up in the laundry room, I kept my orchids in a bright window, and that worked just fine. Now, they are under the shop lights until they bloom. When an orchid is blooming, I usually put it on display somewhere out of direct light so that the blooms will last longer. If it’s been a while since your orchid bloomed, it might need more light.
- I did not repot them in soil. Your orchid will likely come potted in bark or moss. That is because orchids grow best in soilless mixtures. The experts say to repot orchids every one to three years. Um, okay. My orchids are not on an official schedule. When the roots are spilling out of the containers, I think, “Hey, maybe I should repot that.” If I have the same thought several times and I happen to have some orchid potting mixture handy, then I might repot the orchid. But I do always use an orchid potting mixture and not regular potting soil.
- I did not let them sit in water (most of the time), and I did not forget to water them (most of the time). The experts will tell you to water in the morning, placing the plant in the sink and using tepid water and an elaborate ritual that involves letting the water run through the plants for a minute/letting the plant drain completely/gently wiping excess water off the leaves. If you have time to do that, great. If not, just make sure they do get watered. Let them dry out a little before you water them again—if the pot feels heavy, skip watering. My orchids are all potted in a bark medium in plastic pots. The pots sit in seedling trays. I spray water into their pots using an indoor hose that is connected to the laundry room sink. Occasionally, I accidentally overwater, and water remains in the tray/on the leaves. They lived. And although I know I’m not supposed to let the orchids dry out completely, it has happened. They lived. My orchids are not on a strict watering schedule, but I’d say I typically remember to water them about once a week.
- I occasionally remembered to fertilize them. But really not that often. The experts advise using an orchid fertilizer. Some even recommend special fertilizers based on the season—a high nitrogen fertilizer in the spring, and a high phosphorous fertilizer in the fall. They recommend feeding weakly (about half strength) weekly or feeding monthly. Yep. I haven’t quite gotten there yet. I do know that too much fertilizer is bad, so I don’t feel terrible about forgetting to fertilize the orchids. I bought some orchid “bloom booster” fertilizer several years ago, and when I happen to see it sitting on the shelf and happen to have a gallon jug free, I might mix up a batch and feed the orchids. It might happen once a quarter.
- I did not expect miracles. Phalaenopsis orchids bloom once a year. That’s it. So I knew that I wasn’t going to get more flowers shortly after the old ones faded. Okay, if you know how to prune the stem, you might get a second bloom. I have never had much success with stem pruning, so I just cut the stem off when the flowers have faded and wait until next year’s blooms. When the orchid does bloom, the flowers last for weeks.
Now, as you can see, orchids need not be daunting. They can be beautiful even with imperfect care. But if you are interested in knowing how to grow orchids the “right way,” check out the tips from the American Orchid Society.
